Introduction
Arcadia is a comprehensive torrent platform designed to be:
- Easy to setup - Get running quickly with minimal configuration
- Highly configurable - Customize the platform to your needs
- Content agnostic - Support for movies, TV shows, music, books, software, and more
- Well organized - Clean, intuitive interface for both users and administrators
The backend is built with Rust for speed and safety. The frontend is built with Typescript and VueJS, rendered client-side.
What Arcadia Supports
Arcadia supports a wide variety of content types including:
Movies
- Feature Film: Full-length films with rich metadata support.
- Short Film: Shorter cinematic works.
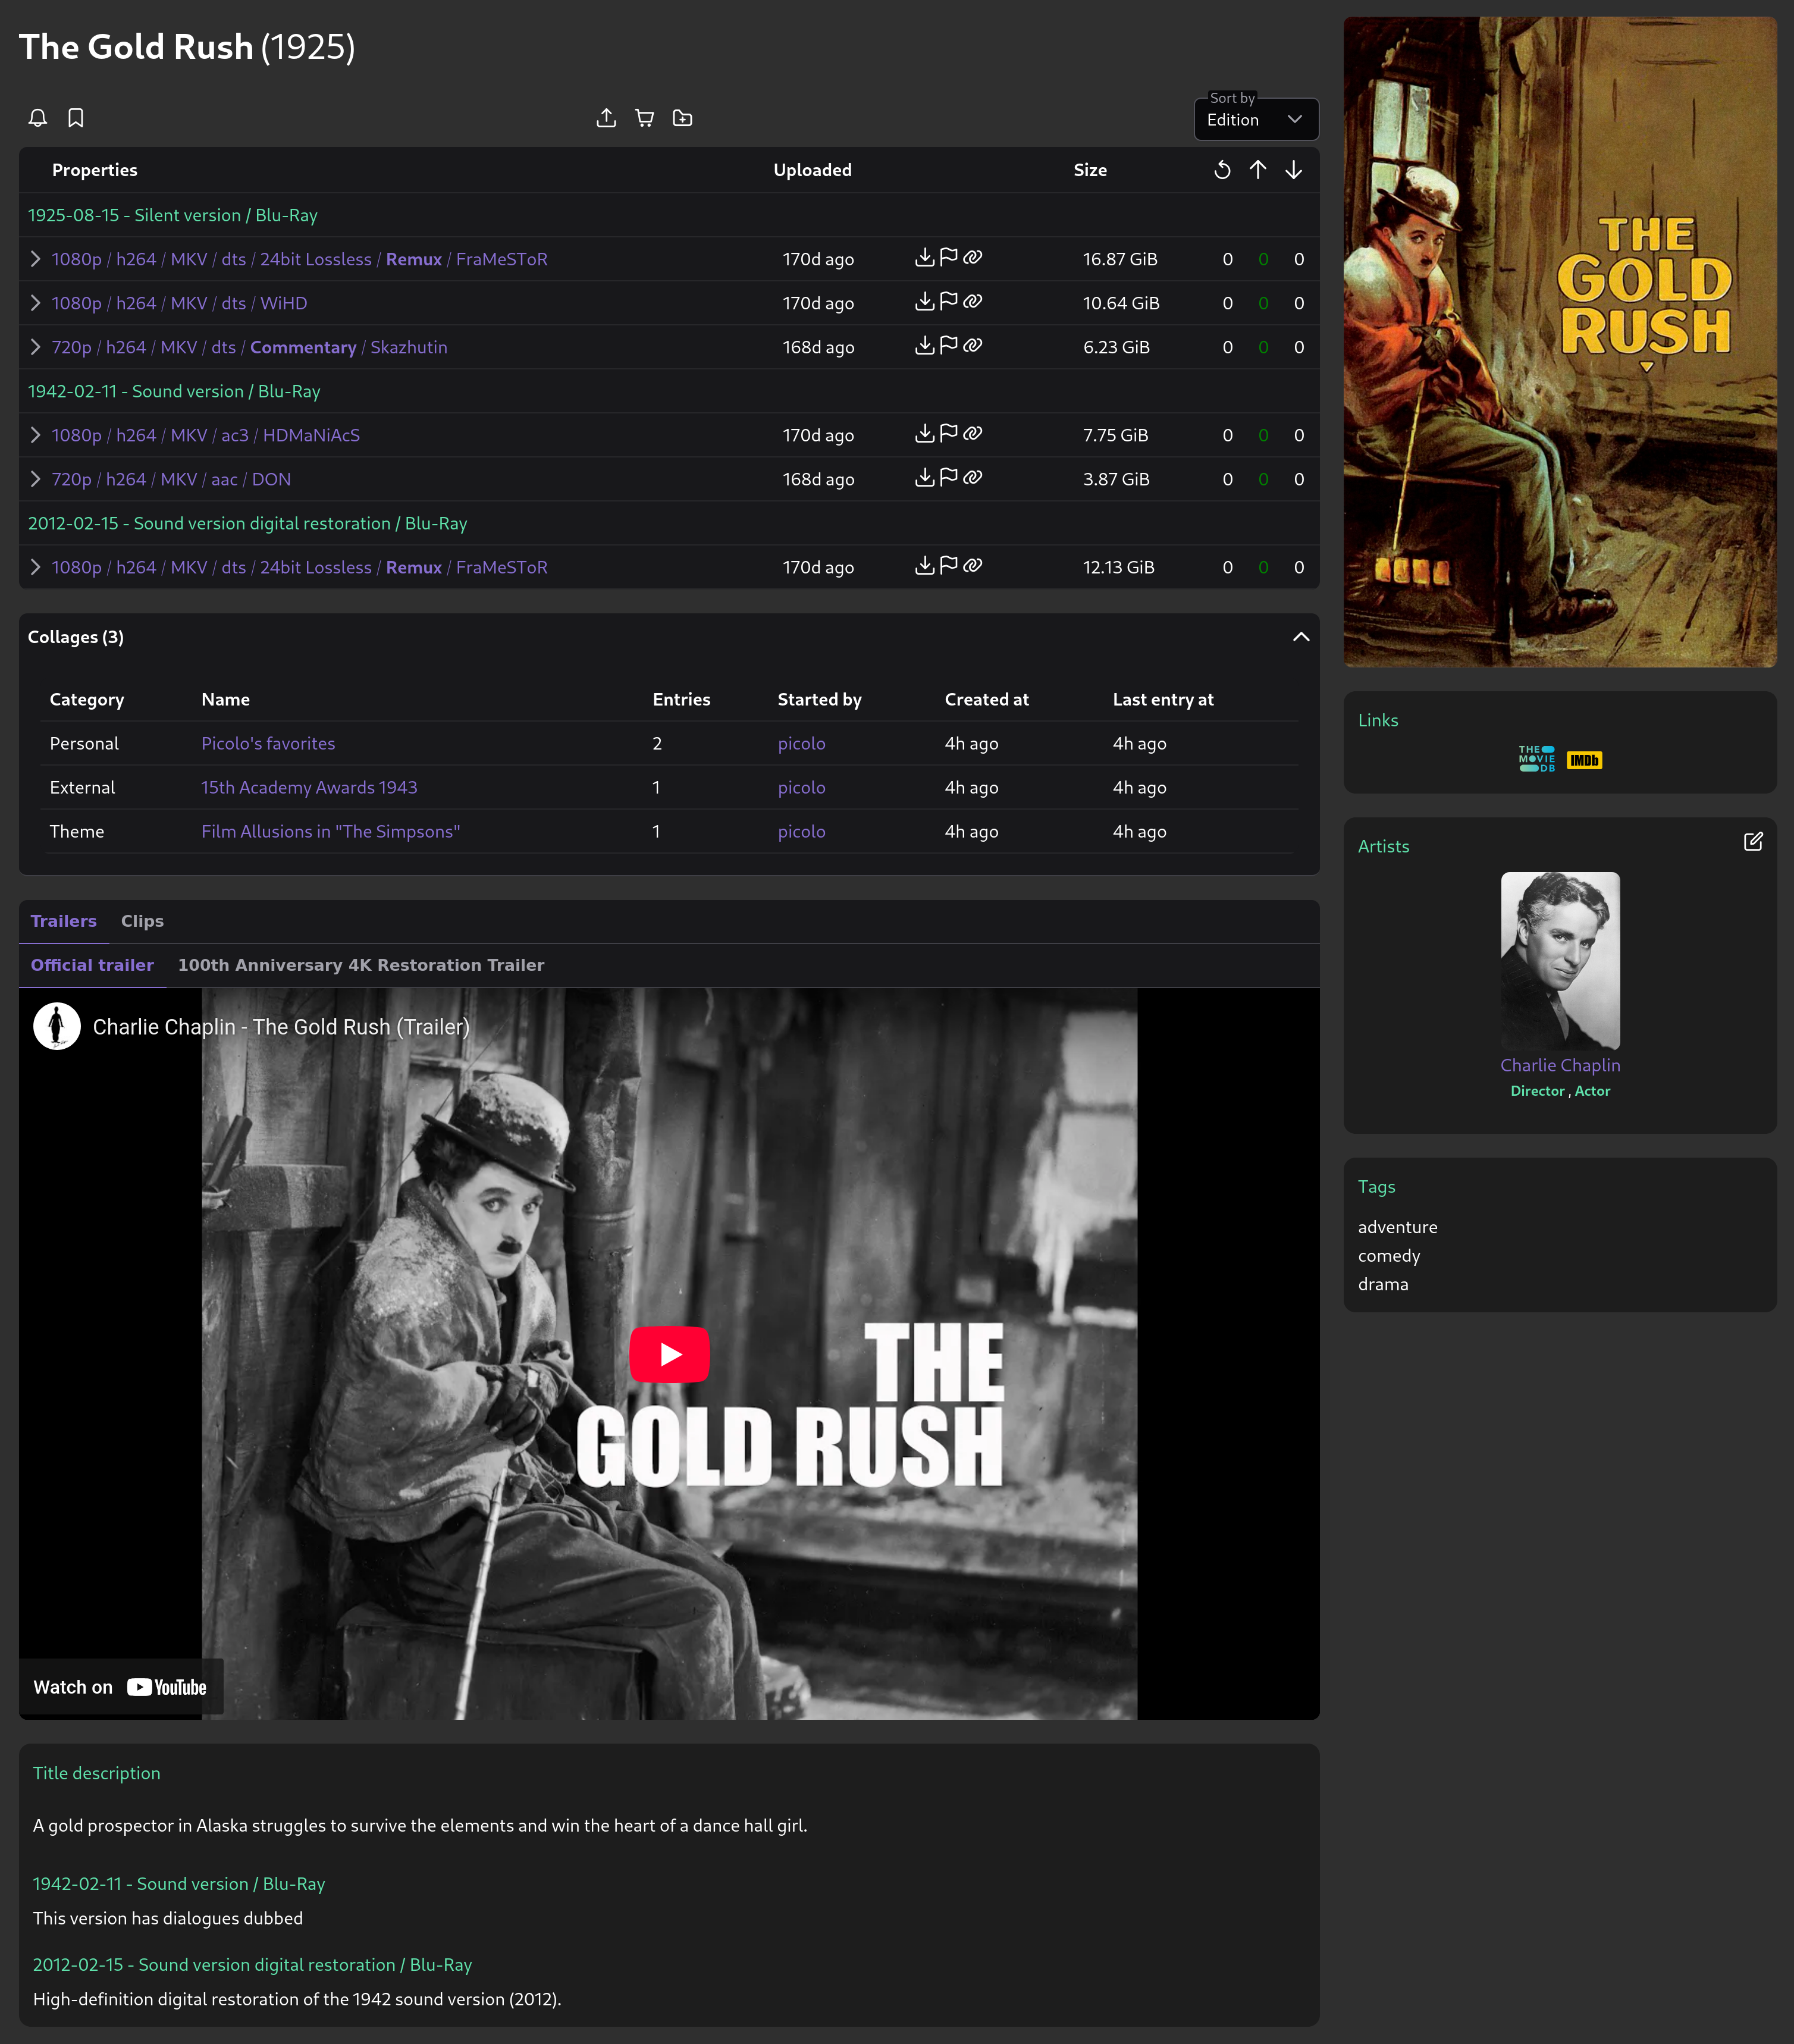
Movie entry
TV Shows
- Series and seasons with episode tracking capabilities.
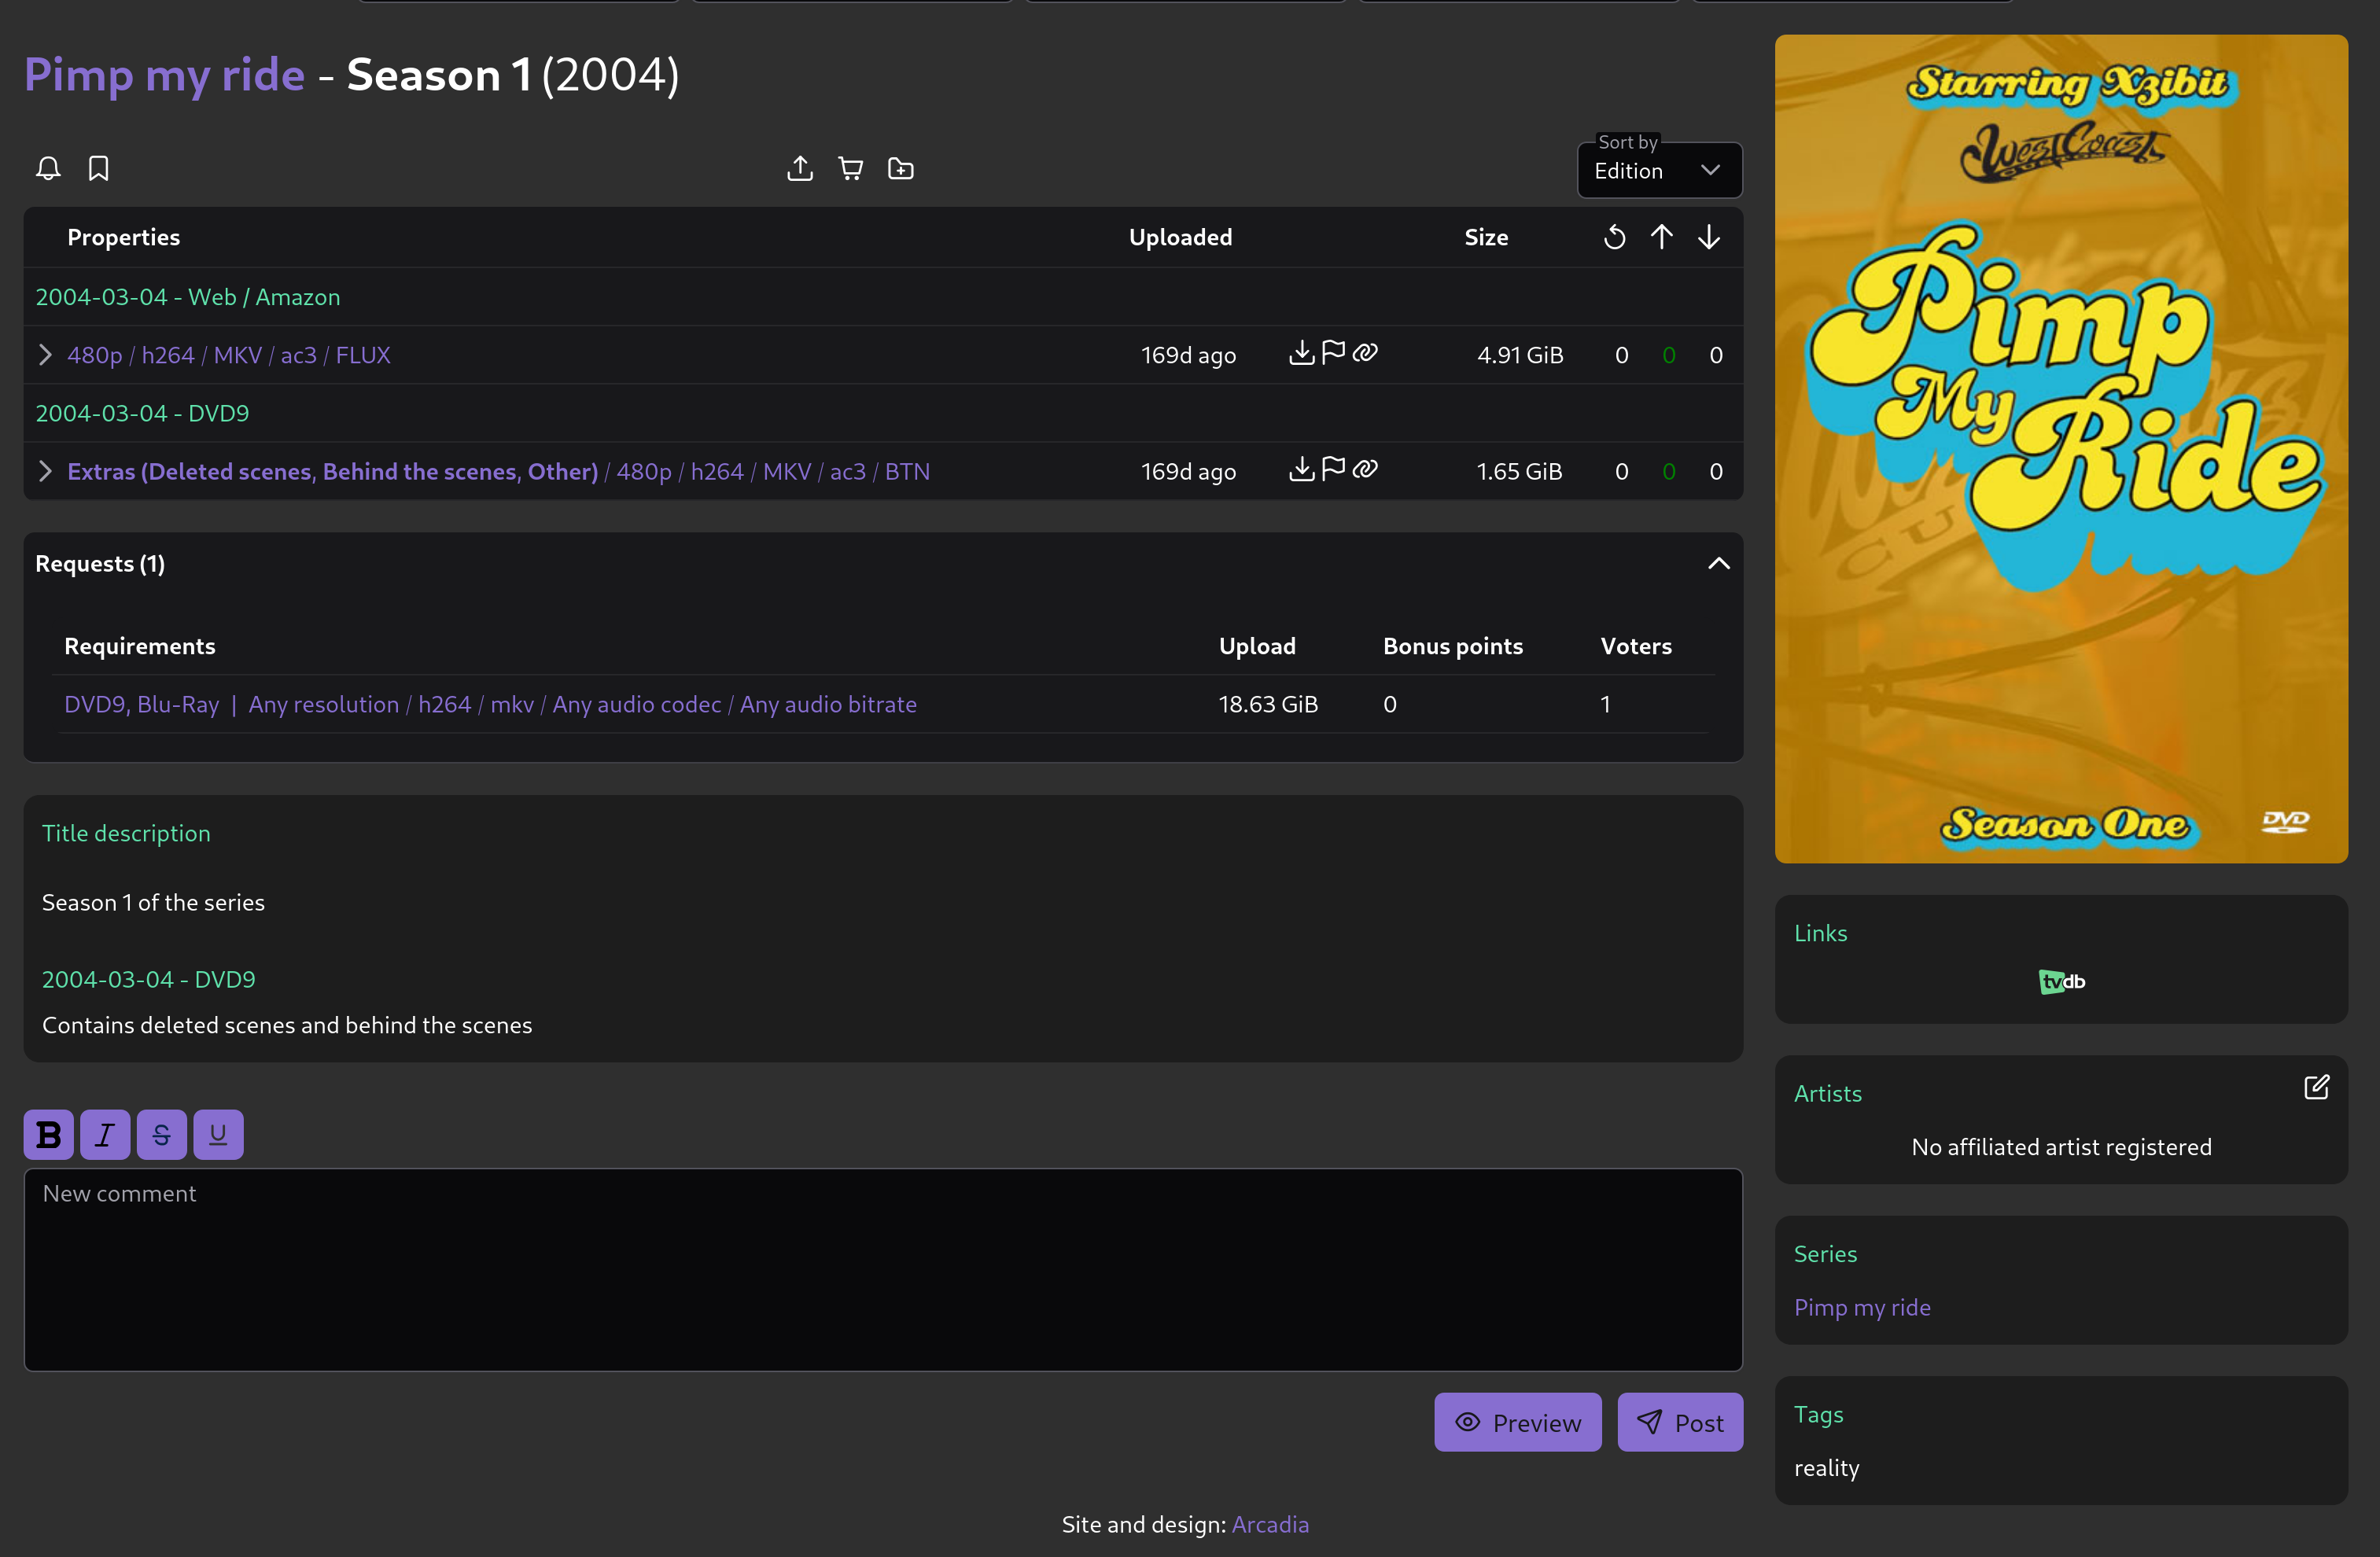
TV Show - Season entry
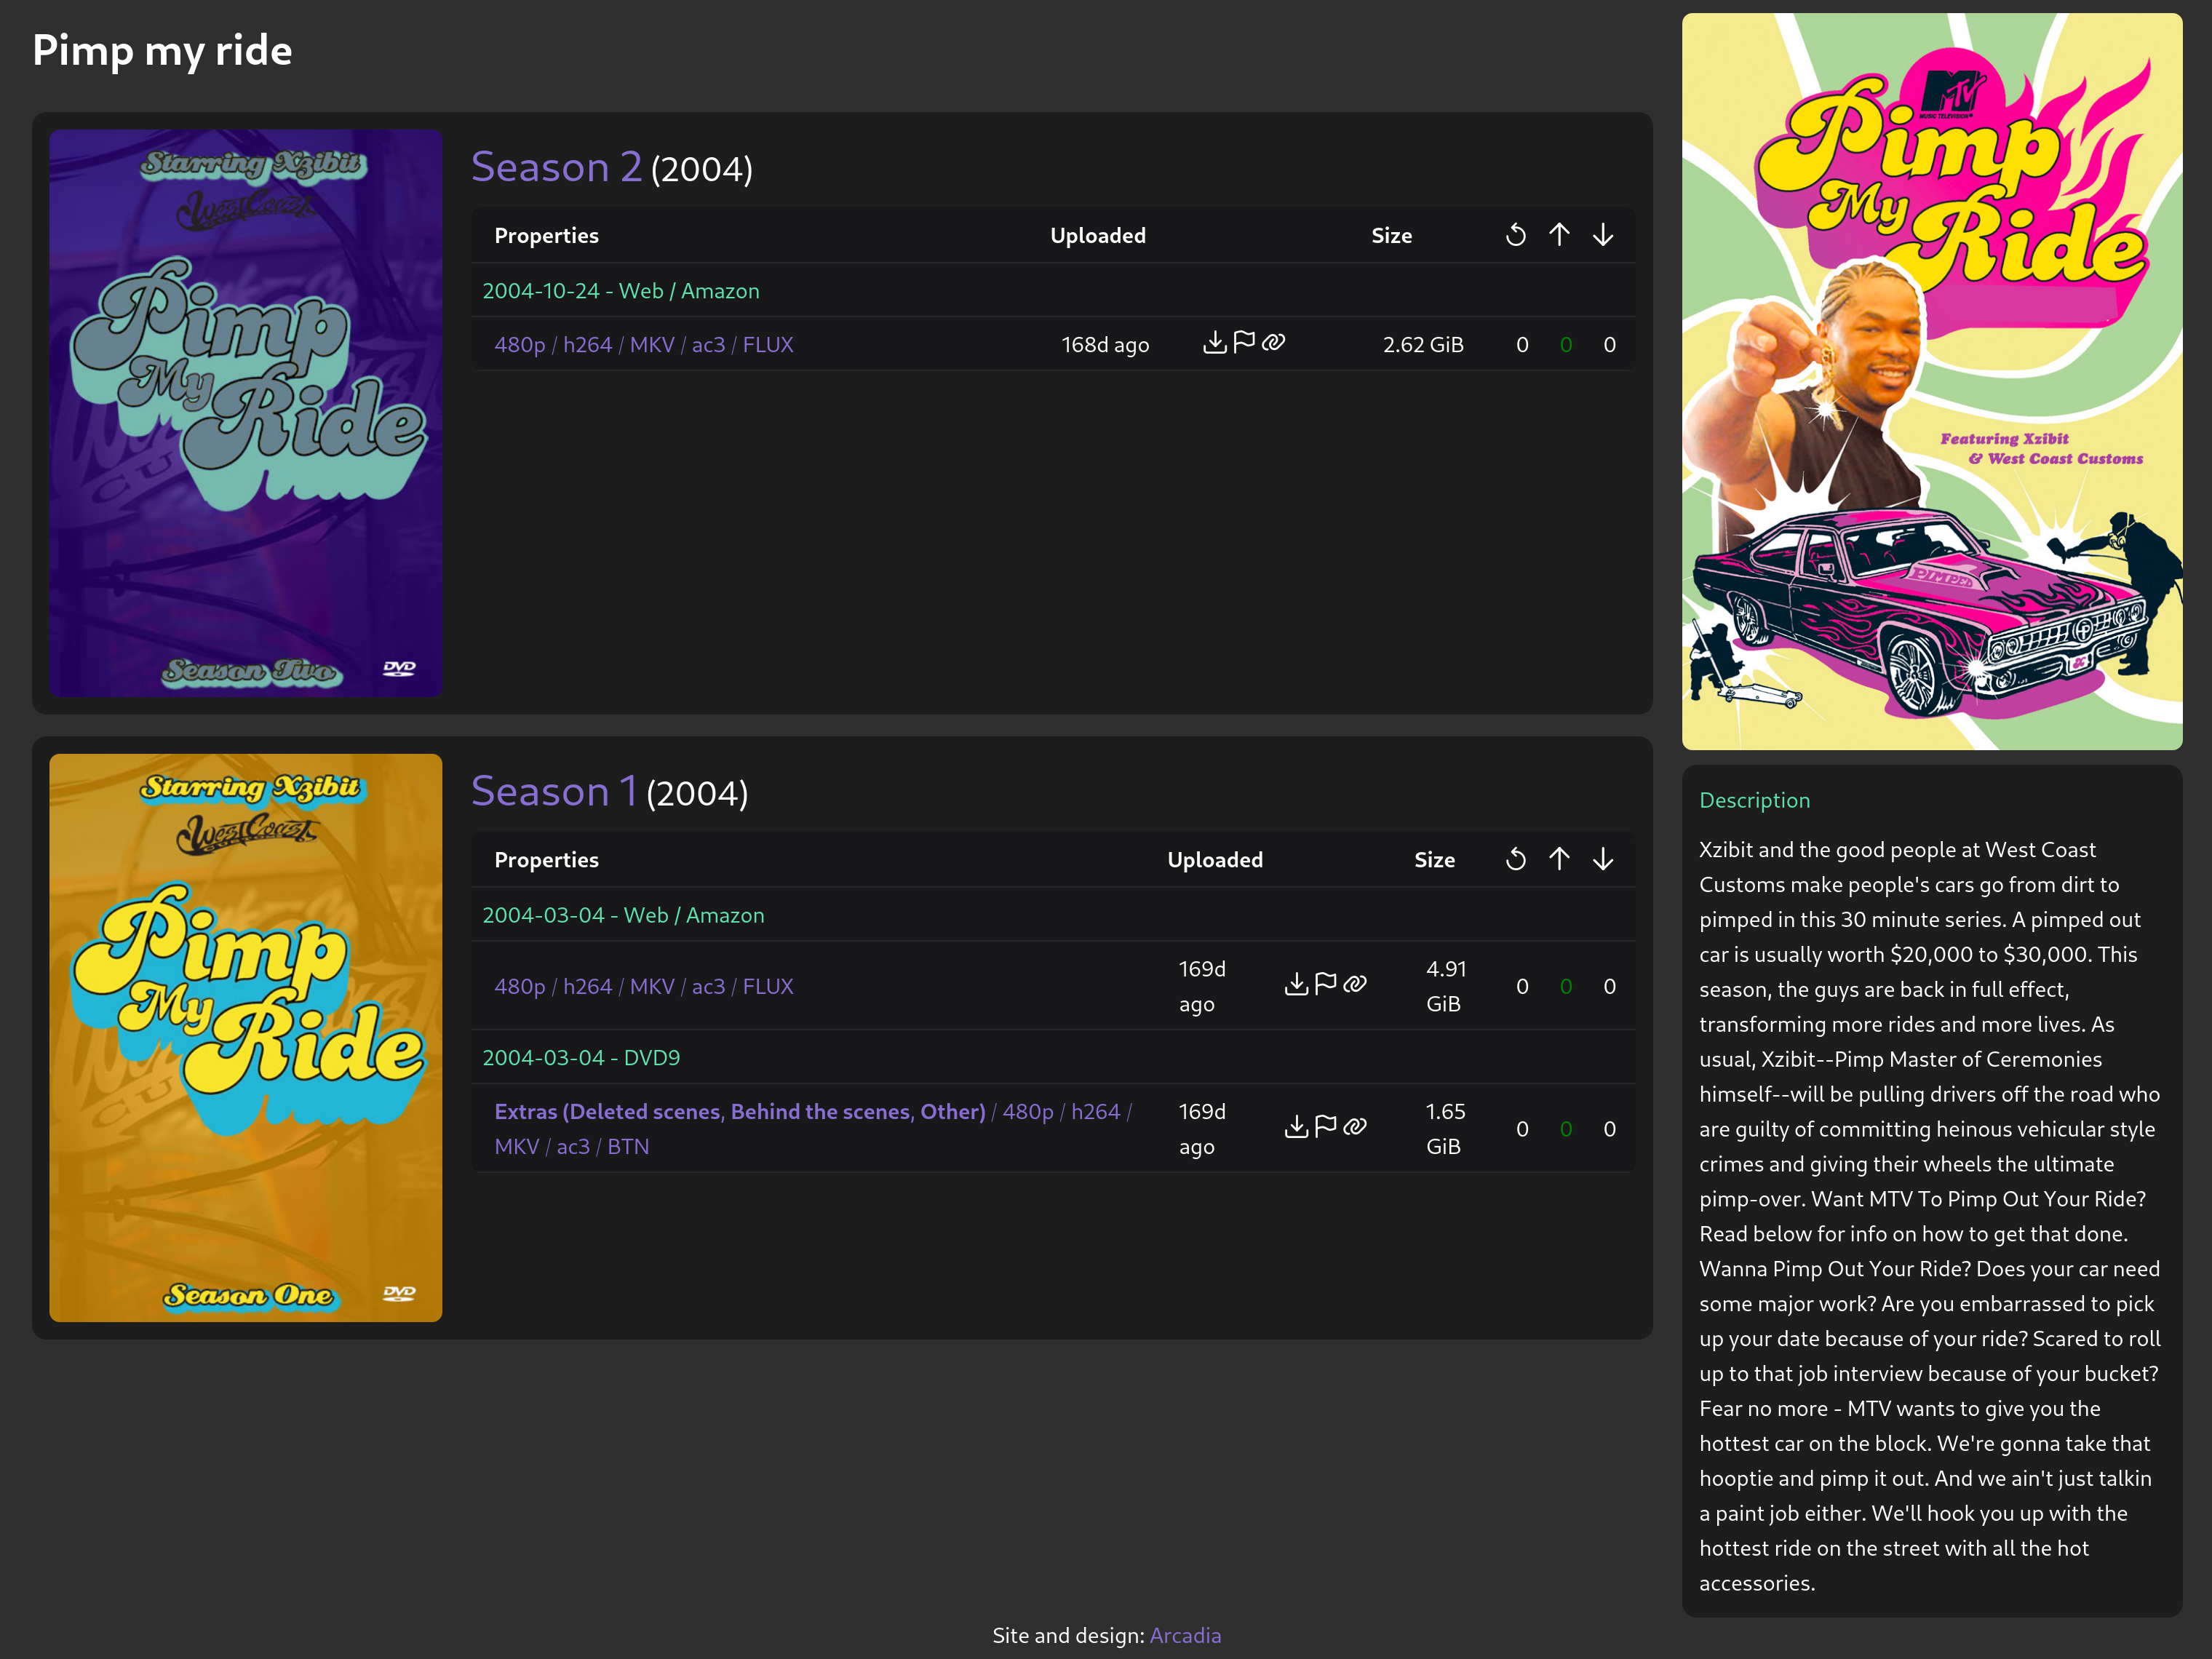
TV Show - Series view
Music
- Album: Includes “live album” as an “edition.”
- EP: Extended plays.
- Single: Individual tracks.
- Soundtrack: Music from movies, TV shows, or games.
- Anthology: Collections of works by an artist or group.
- Compilation: Curated collections of tracks.
- Remix: Reimagined versions of original tracks.
- Bootleg: Unofficial recordings.
- Mixtape: Curated playlists or unofficial releases.
- Concert Recording: Live performance recordings.
- DJ Mix: Continuous mixes by DJs.
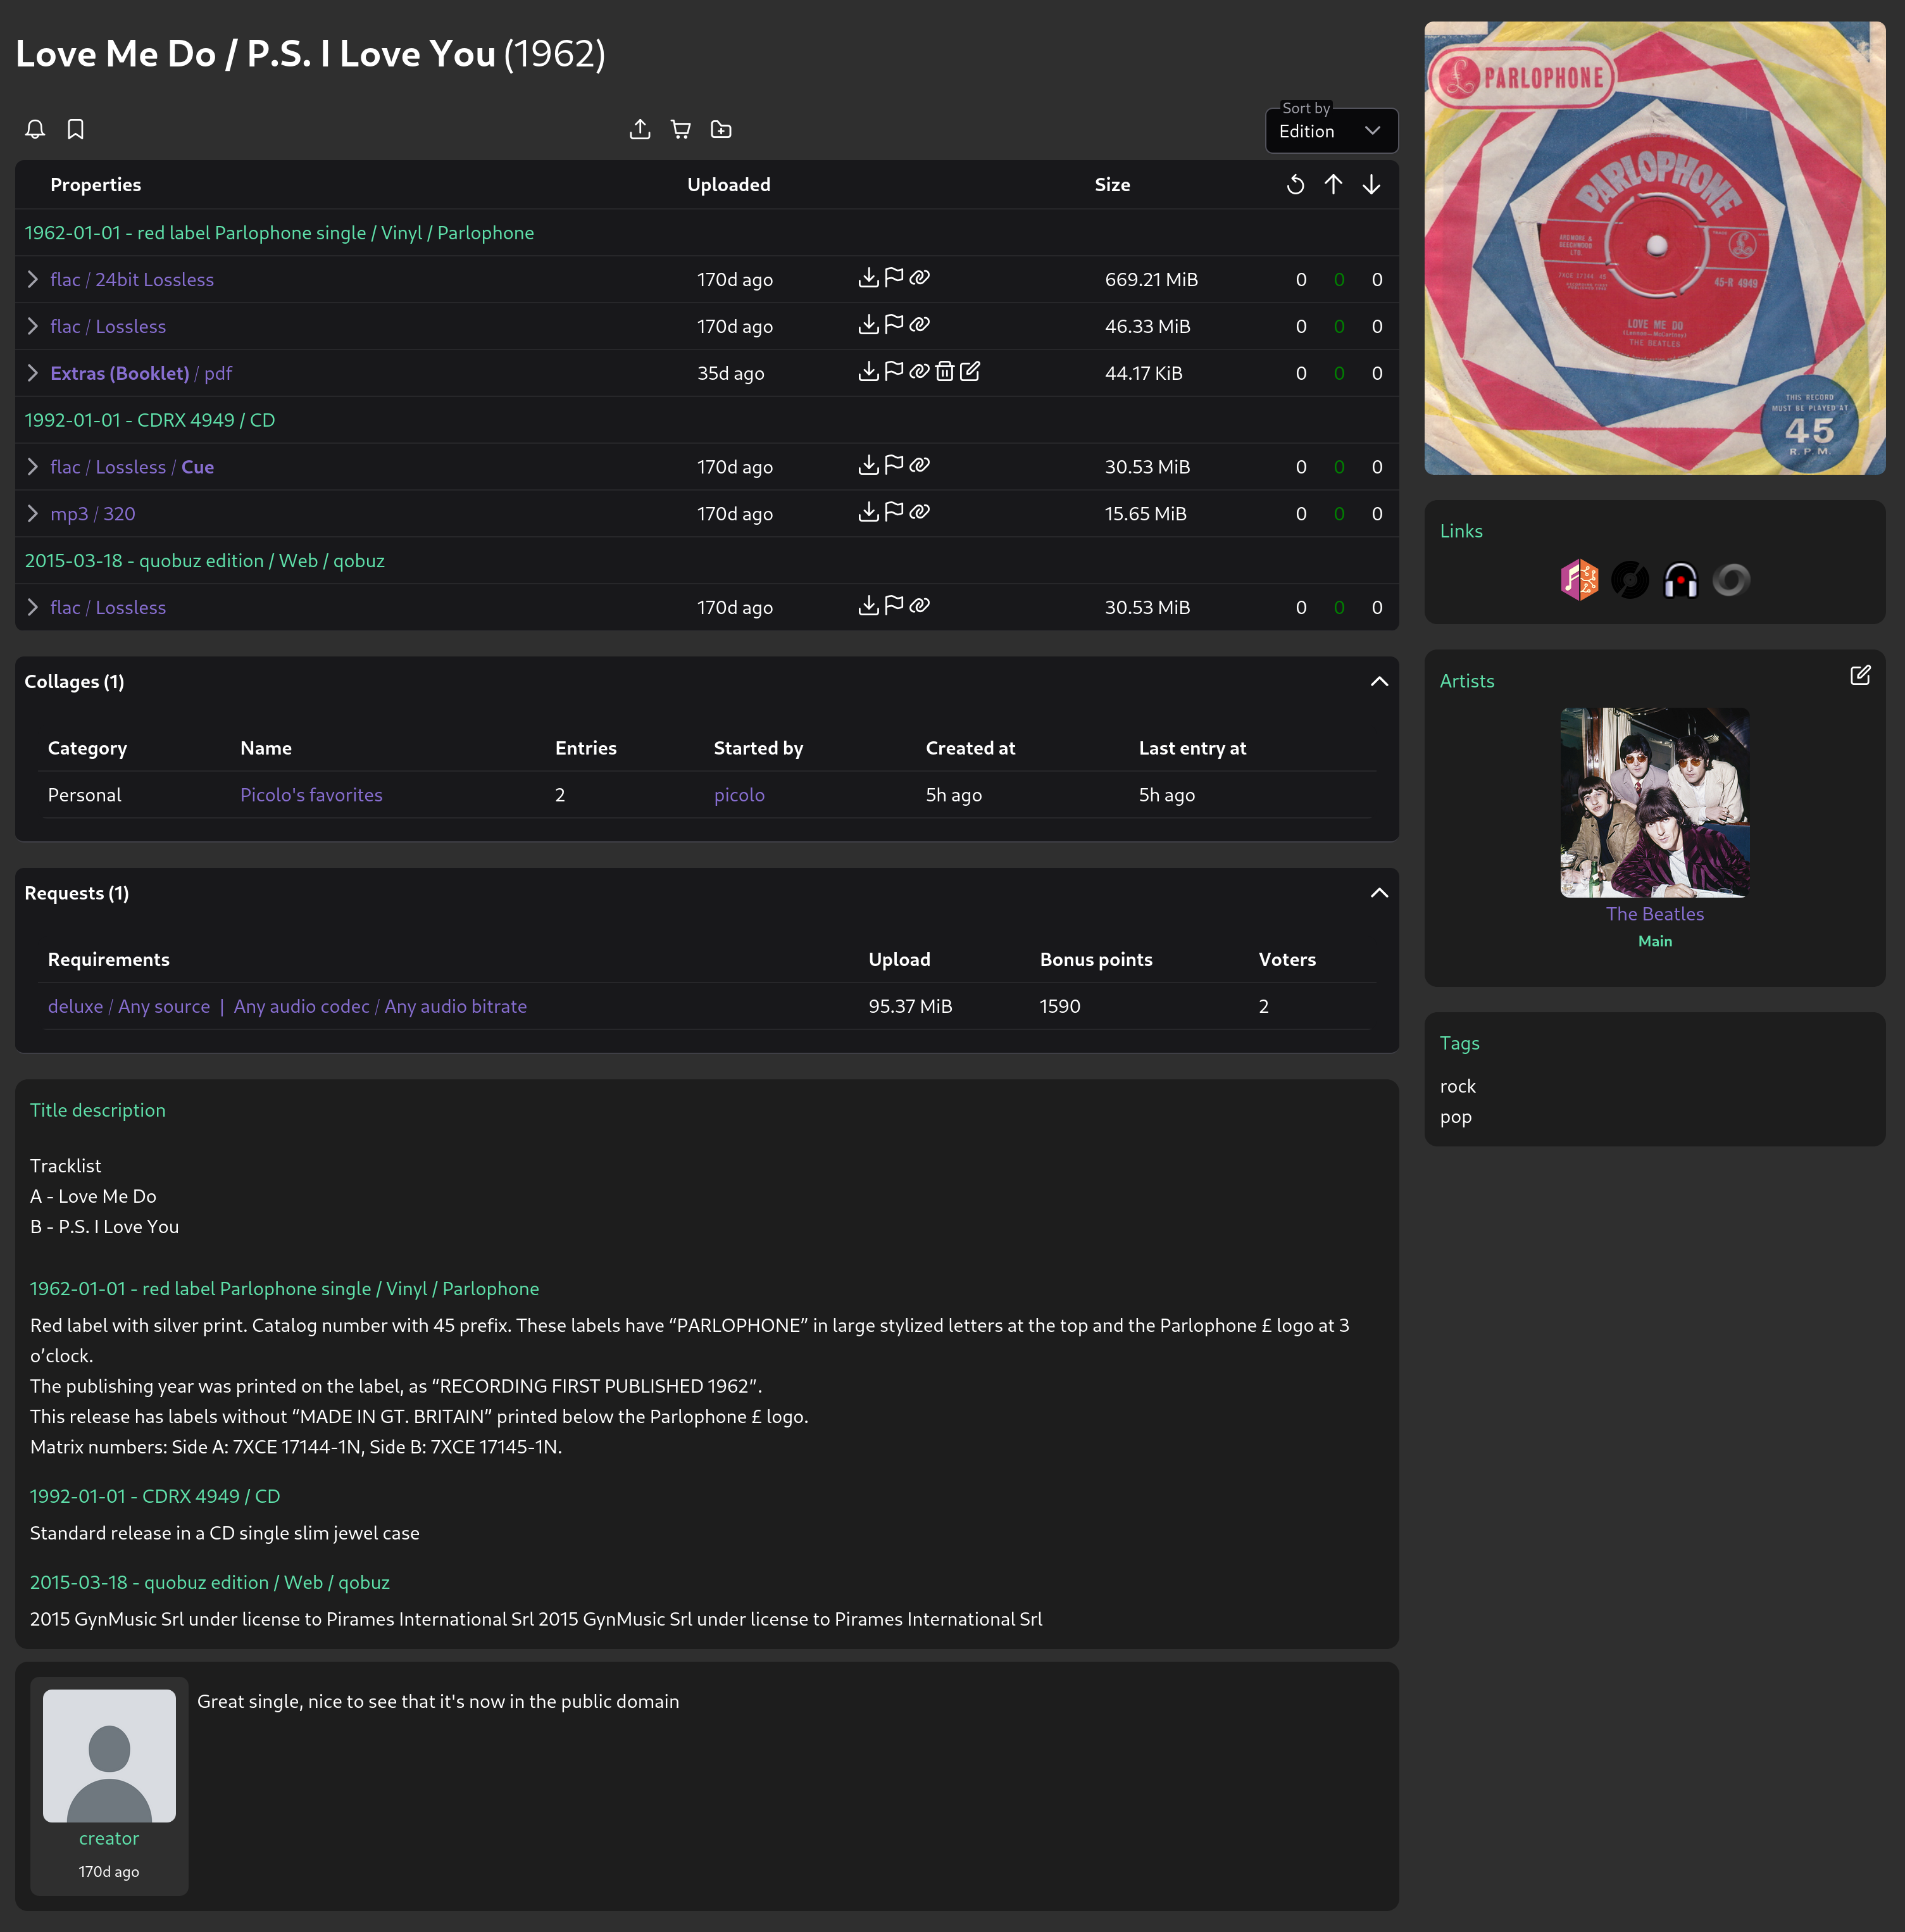
Music
Software
- Game: Video games of all genres.
- Program: Applications and utilities.
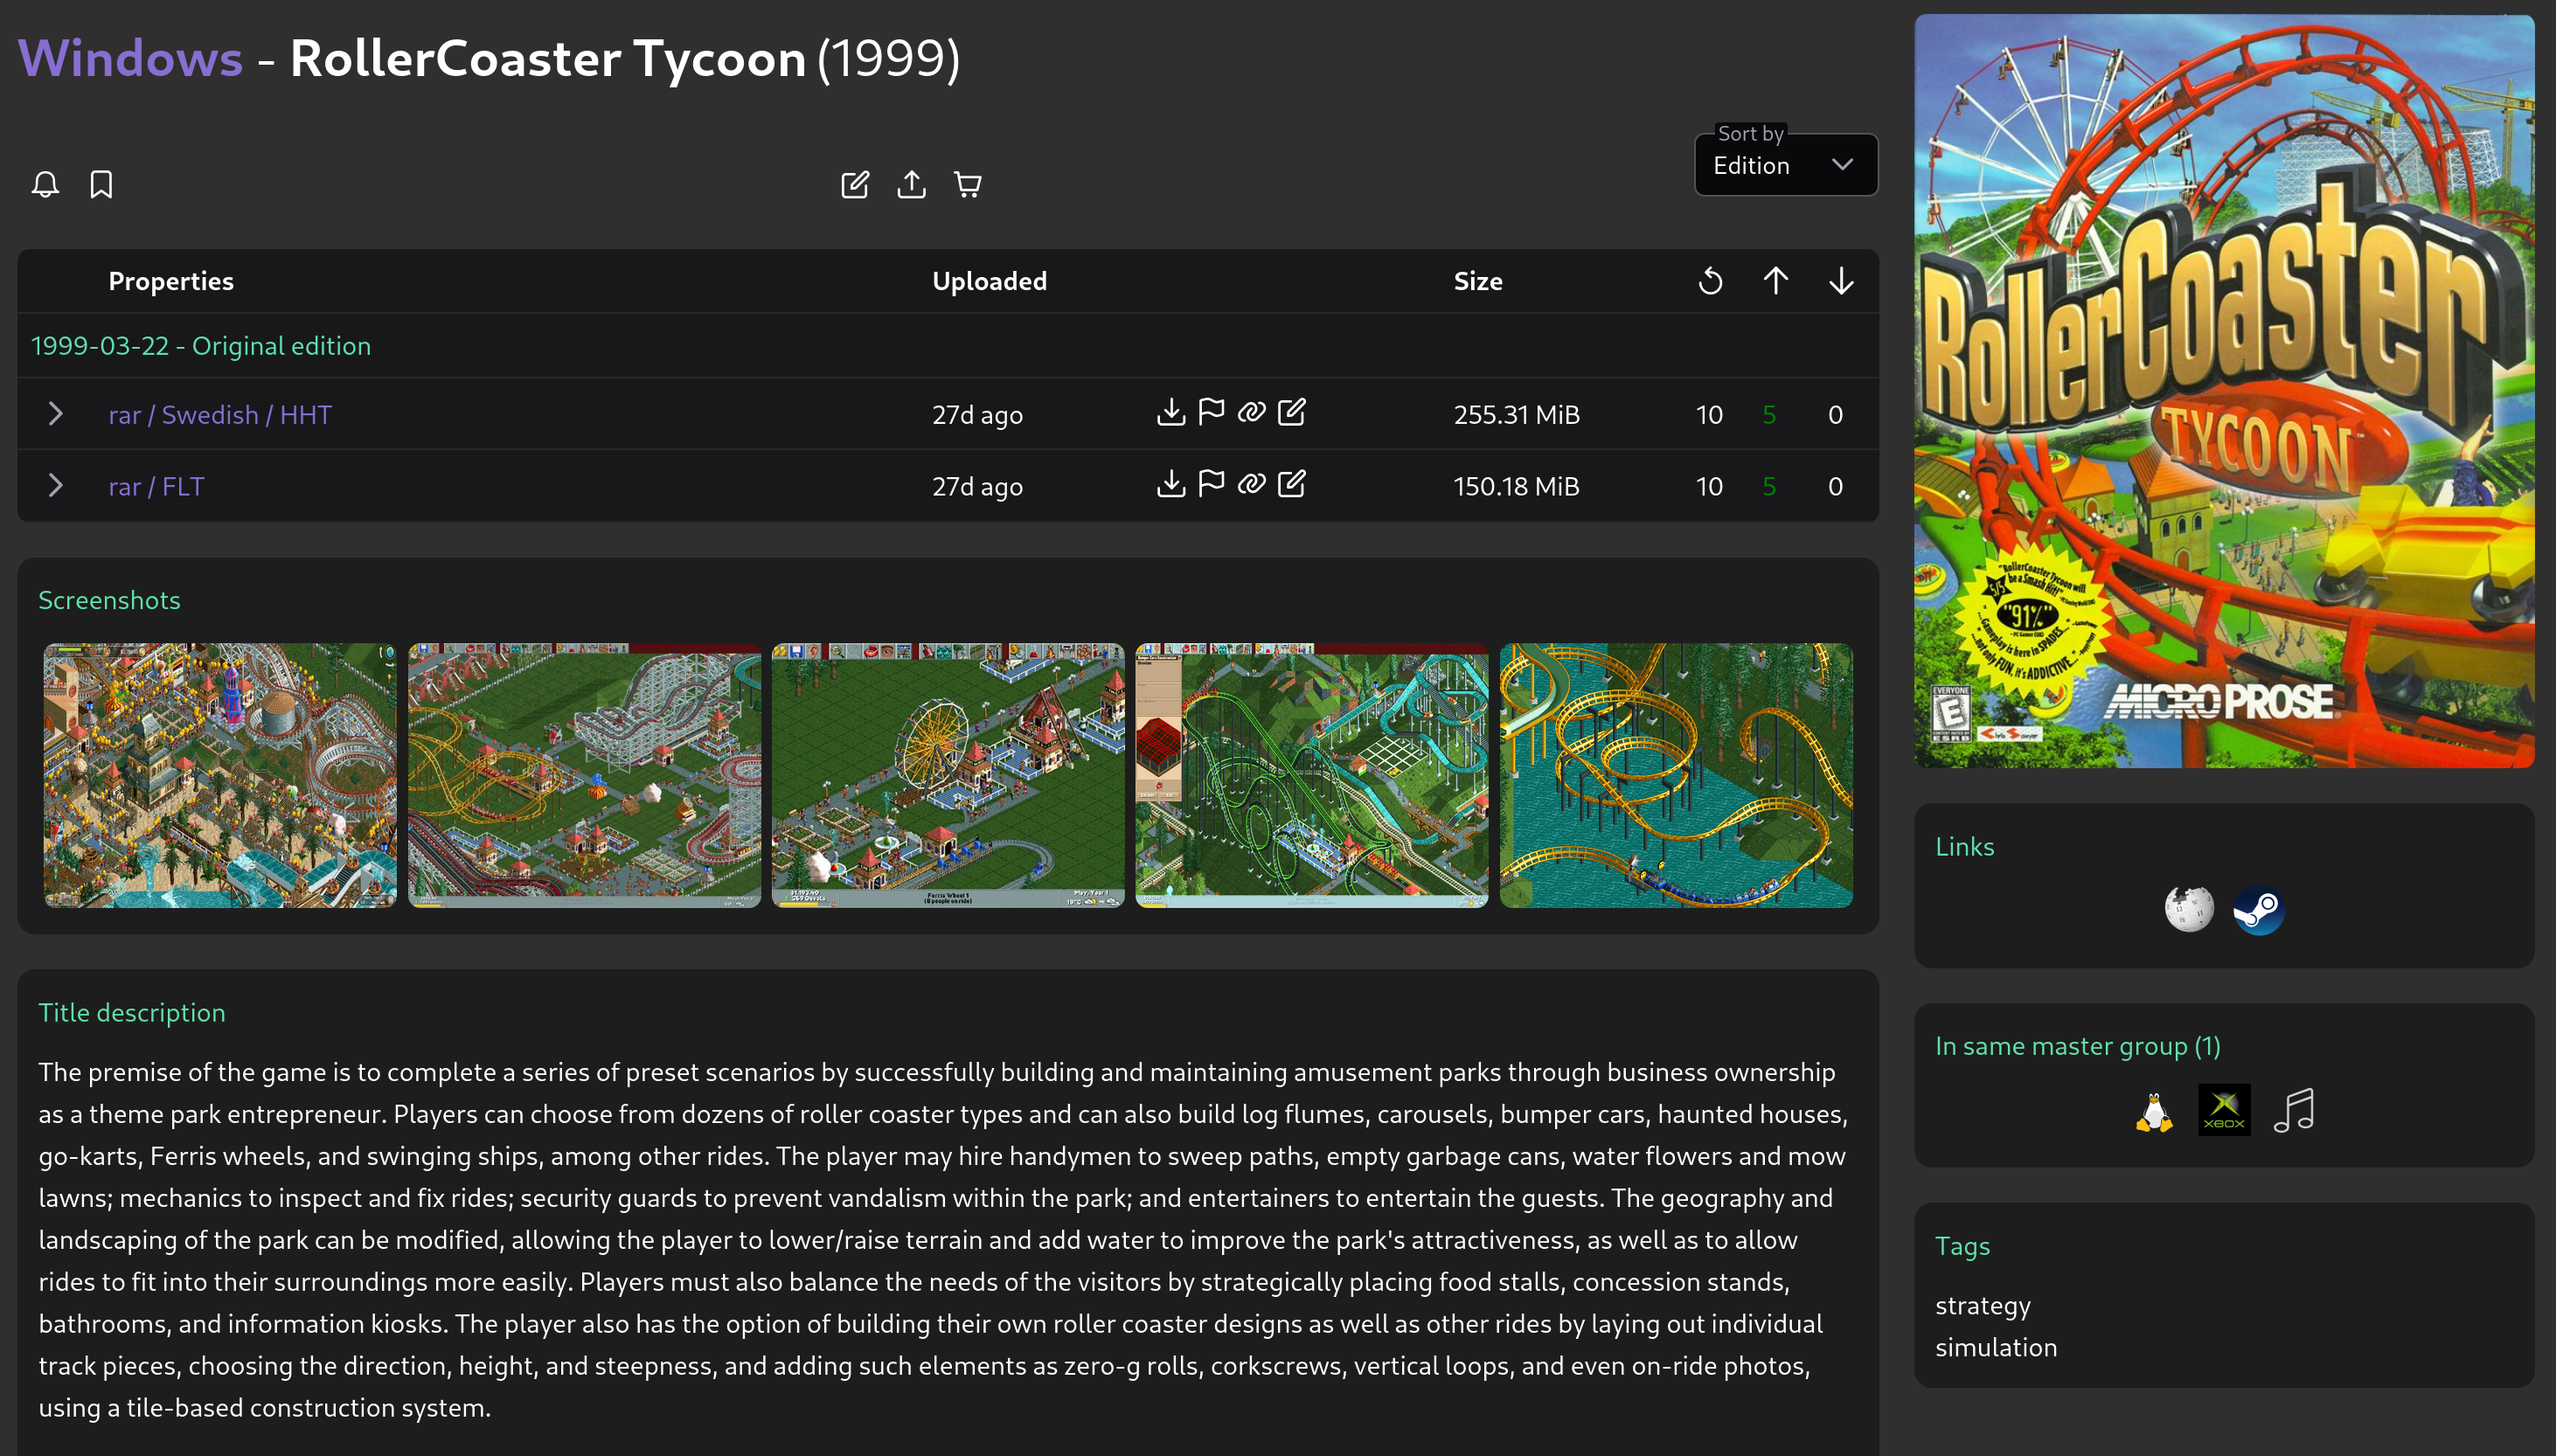
Software - Game
Written Documents
- Book: Includes hardcover, paperback, and digital formats.
- Illustrated: Includes mangas, comics, and visual novels.
- Periodical: Newspapers, magazines, and journals.
- Article: Studies, theses, essays, and research papers.
- Manual: Guides, music sheets, and instructional documents.
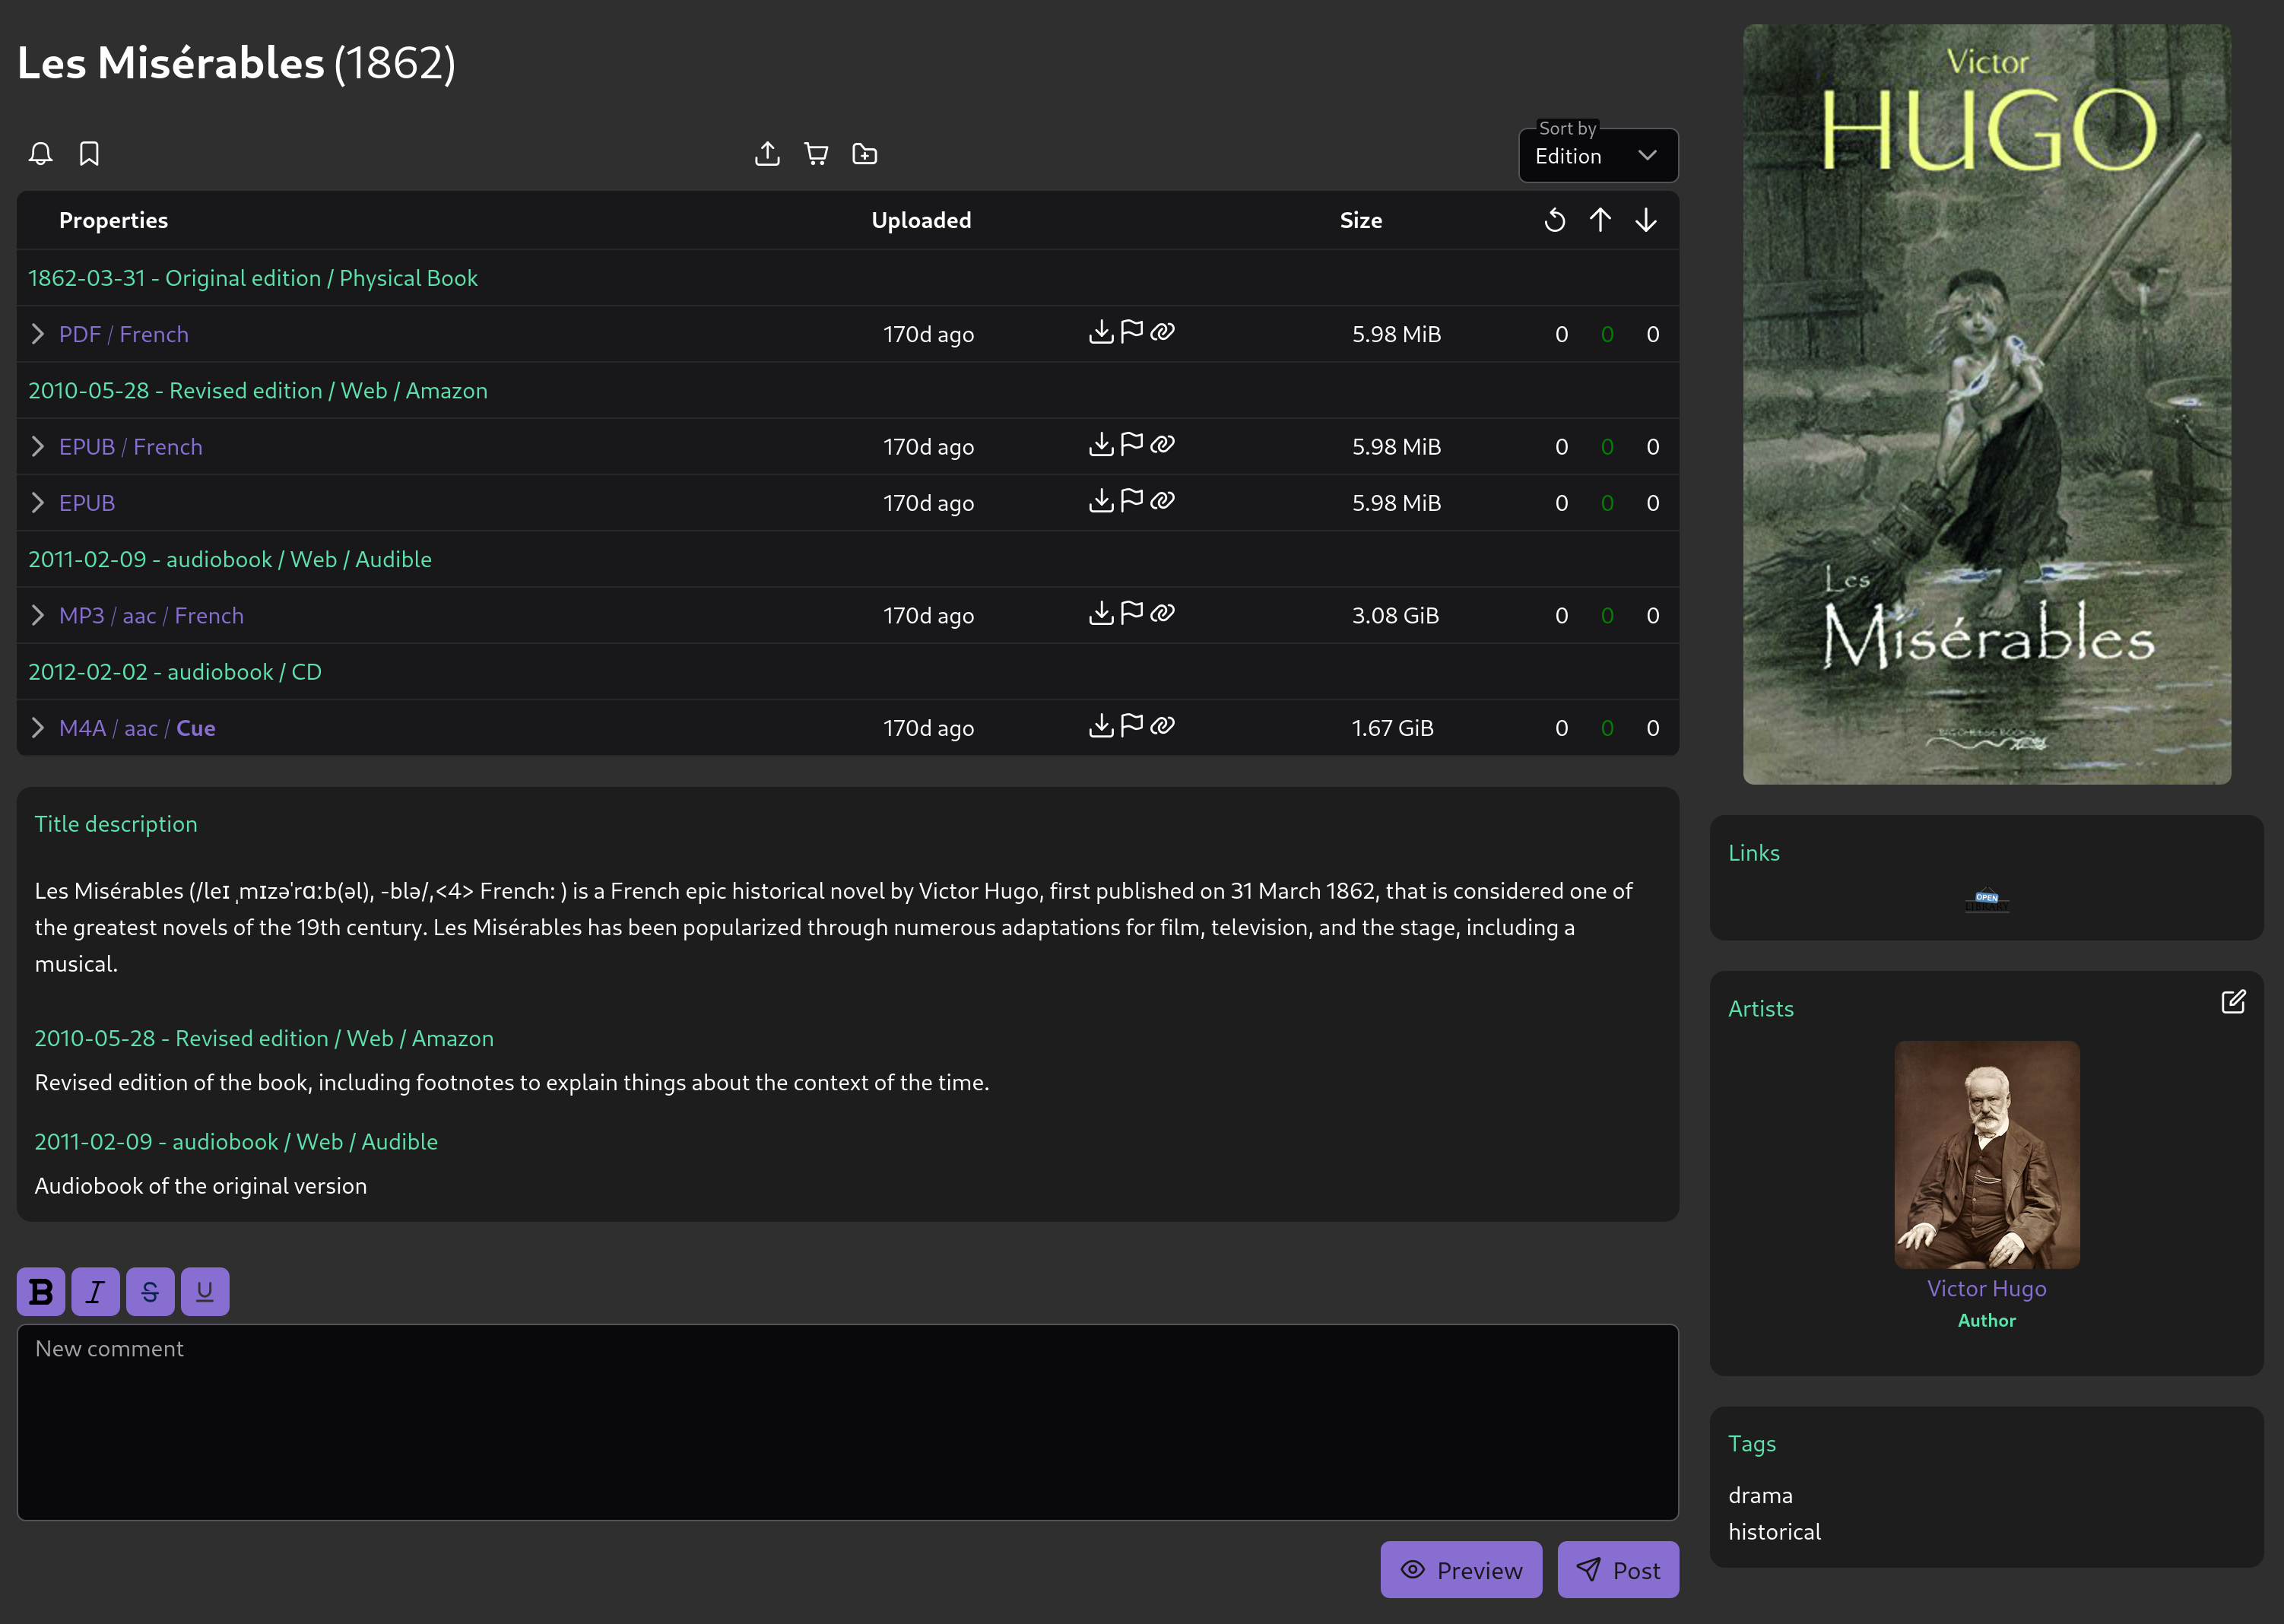
Book - Entry view
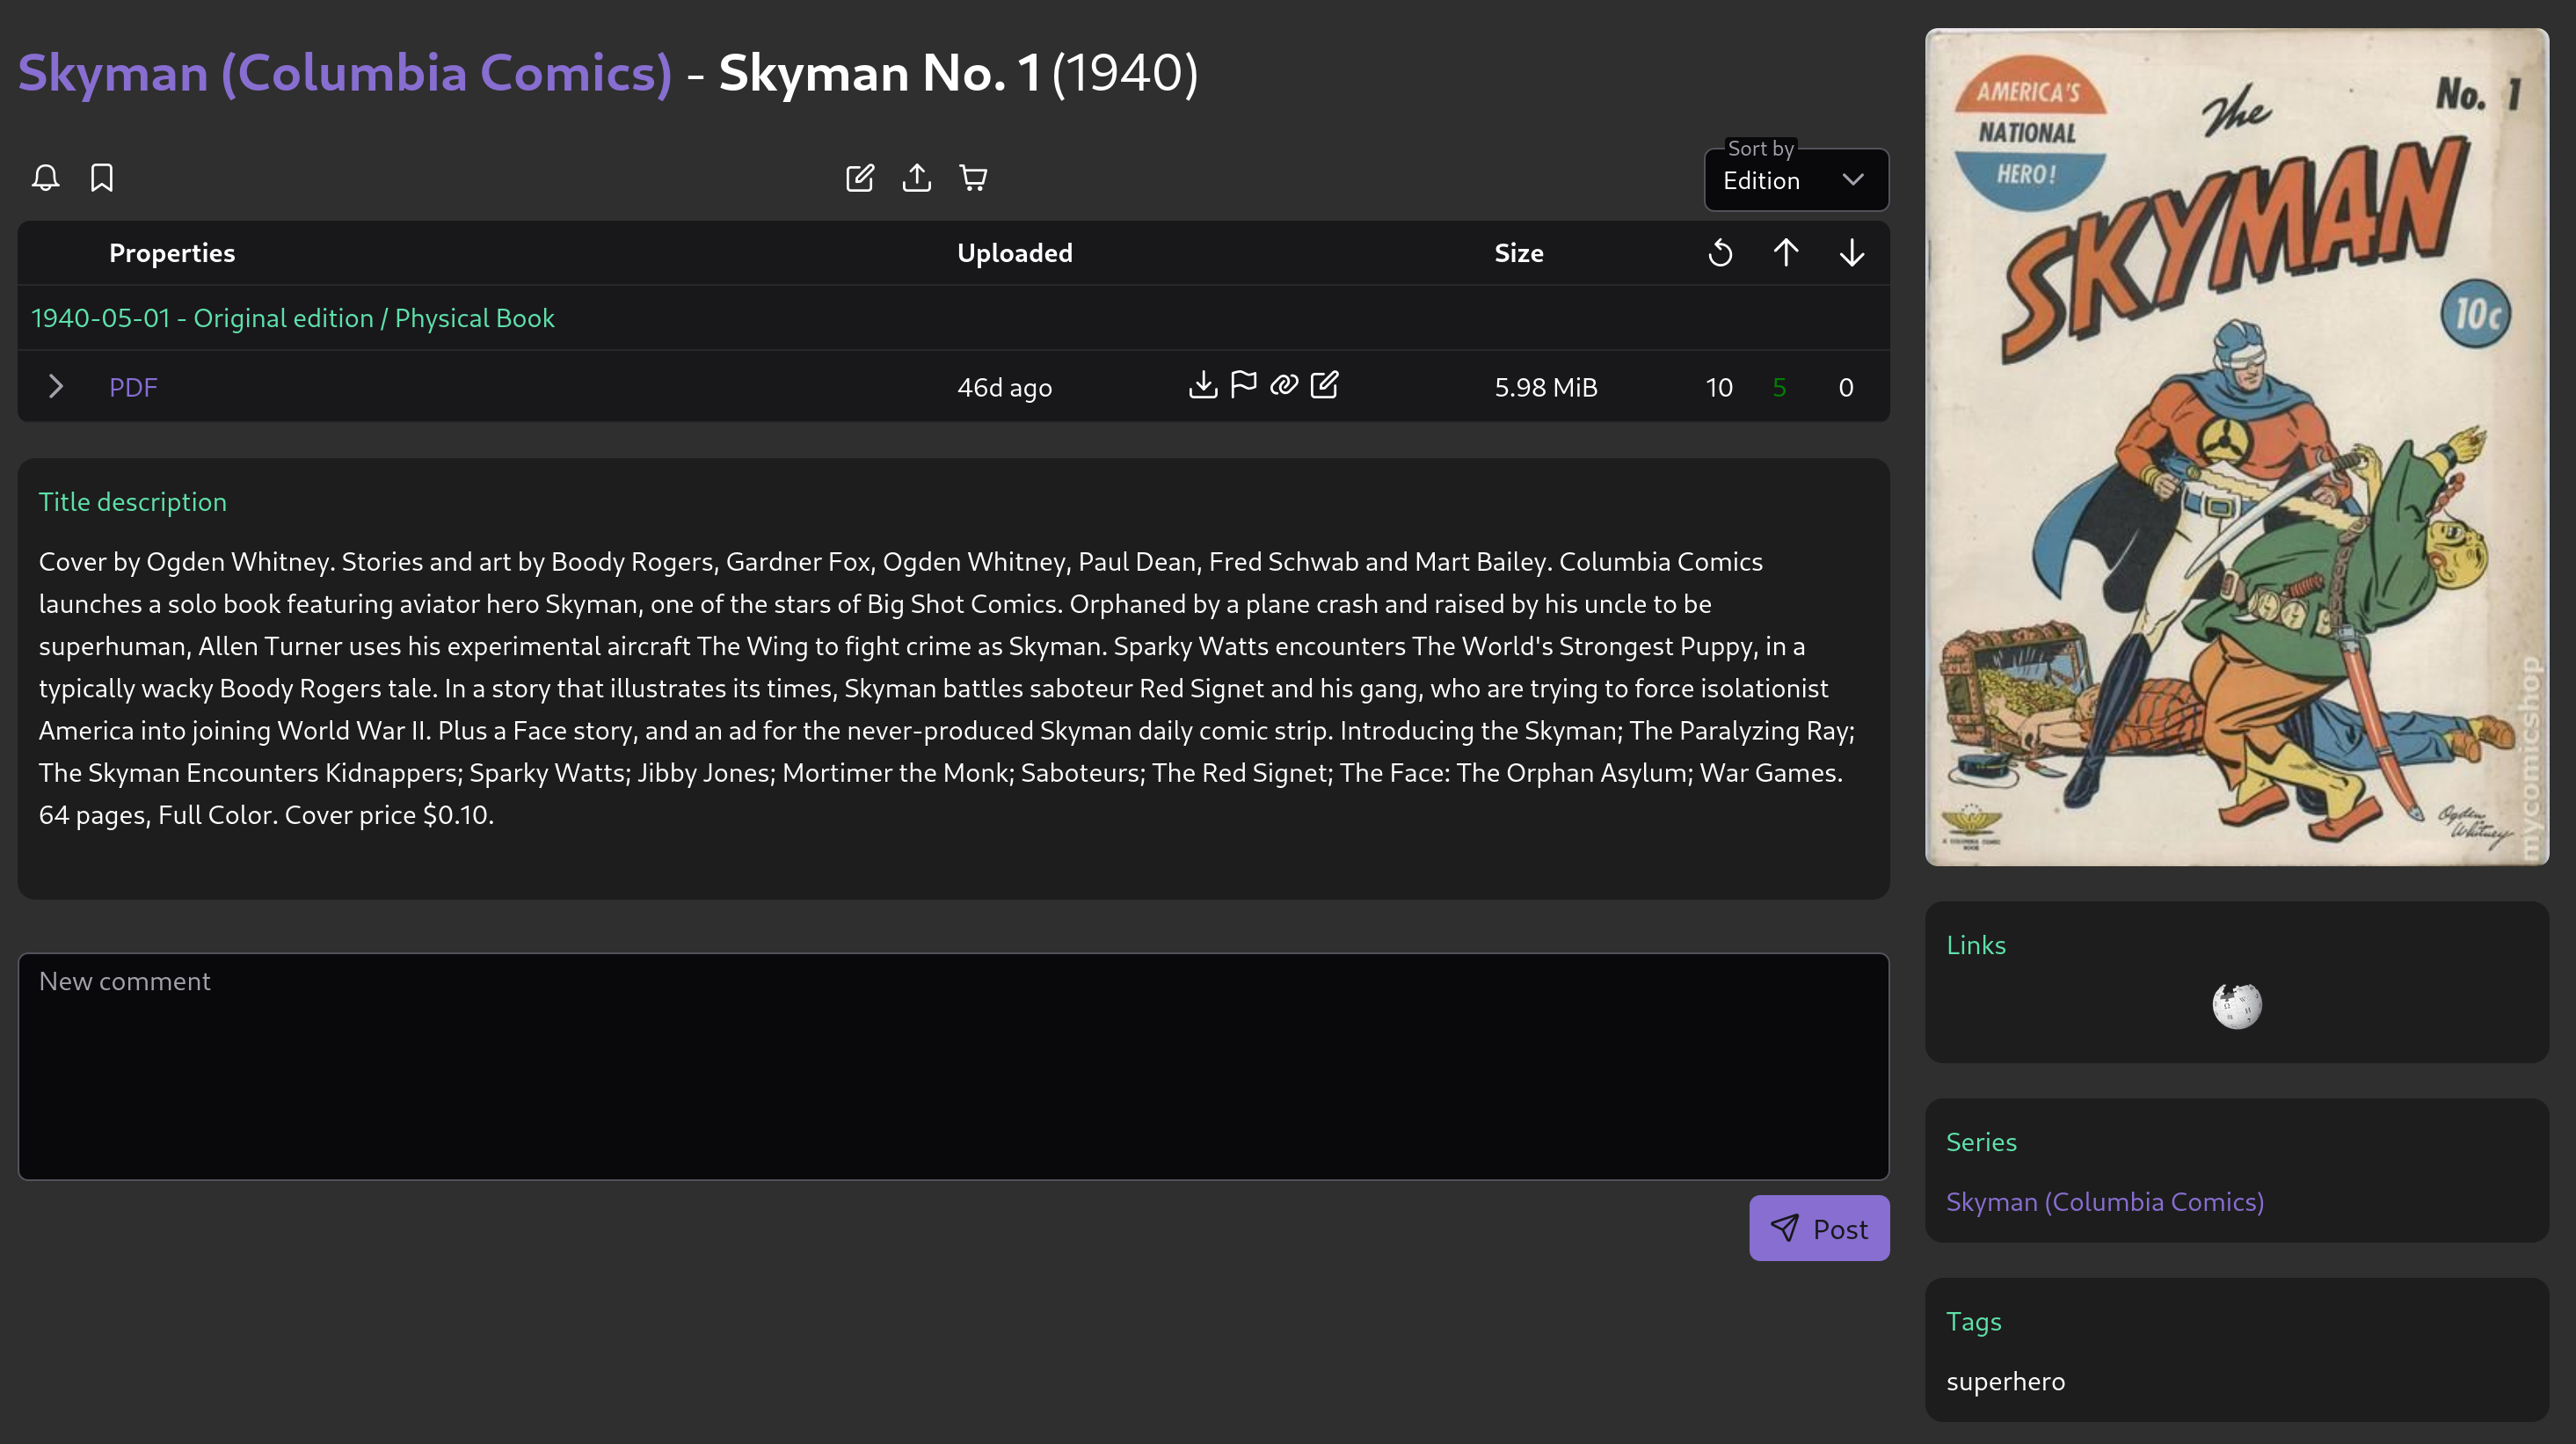
Book - Illustrated
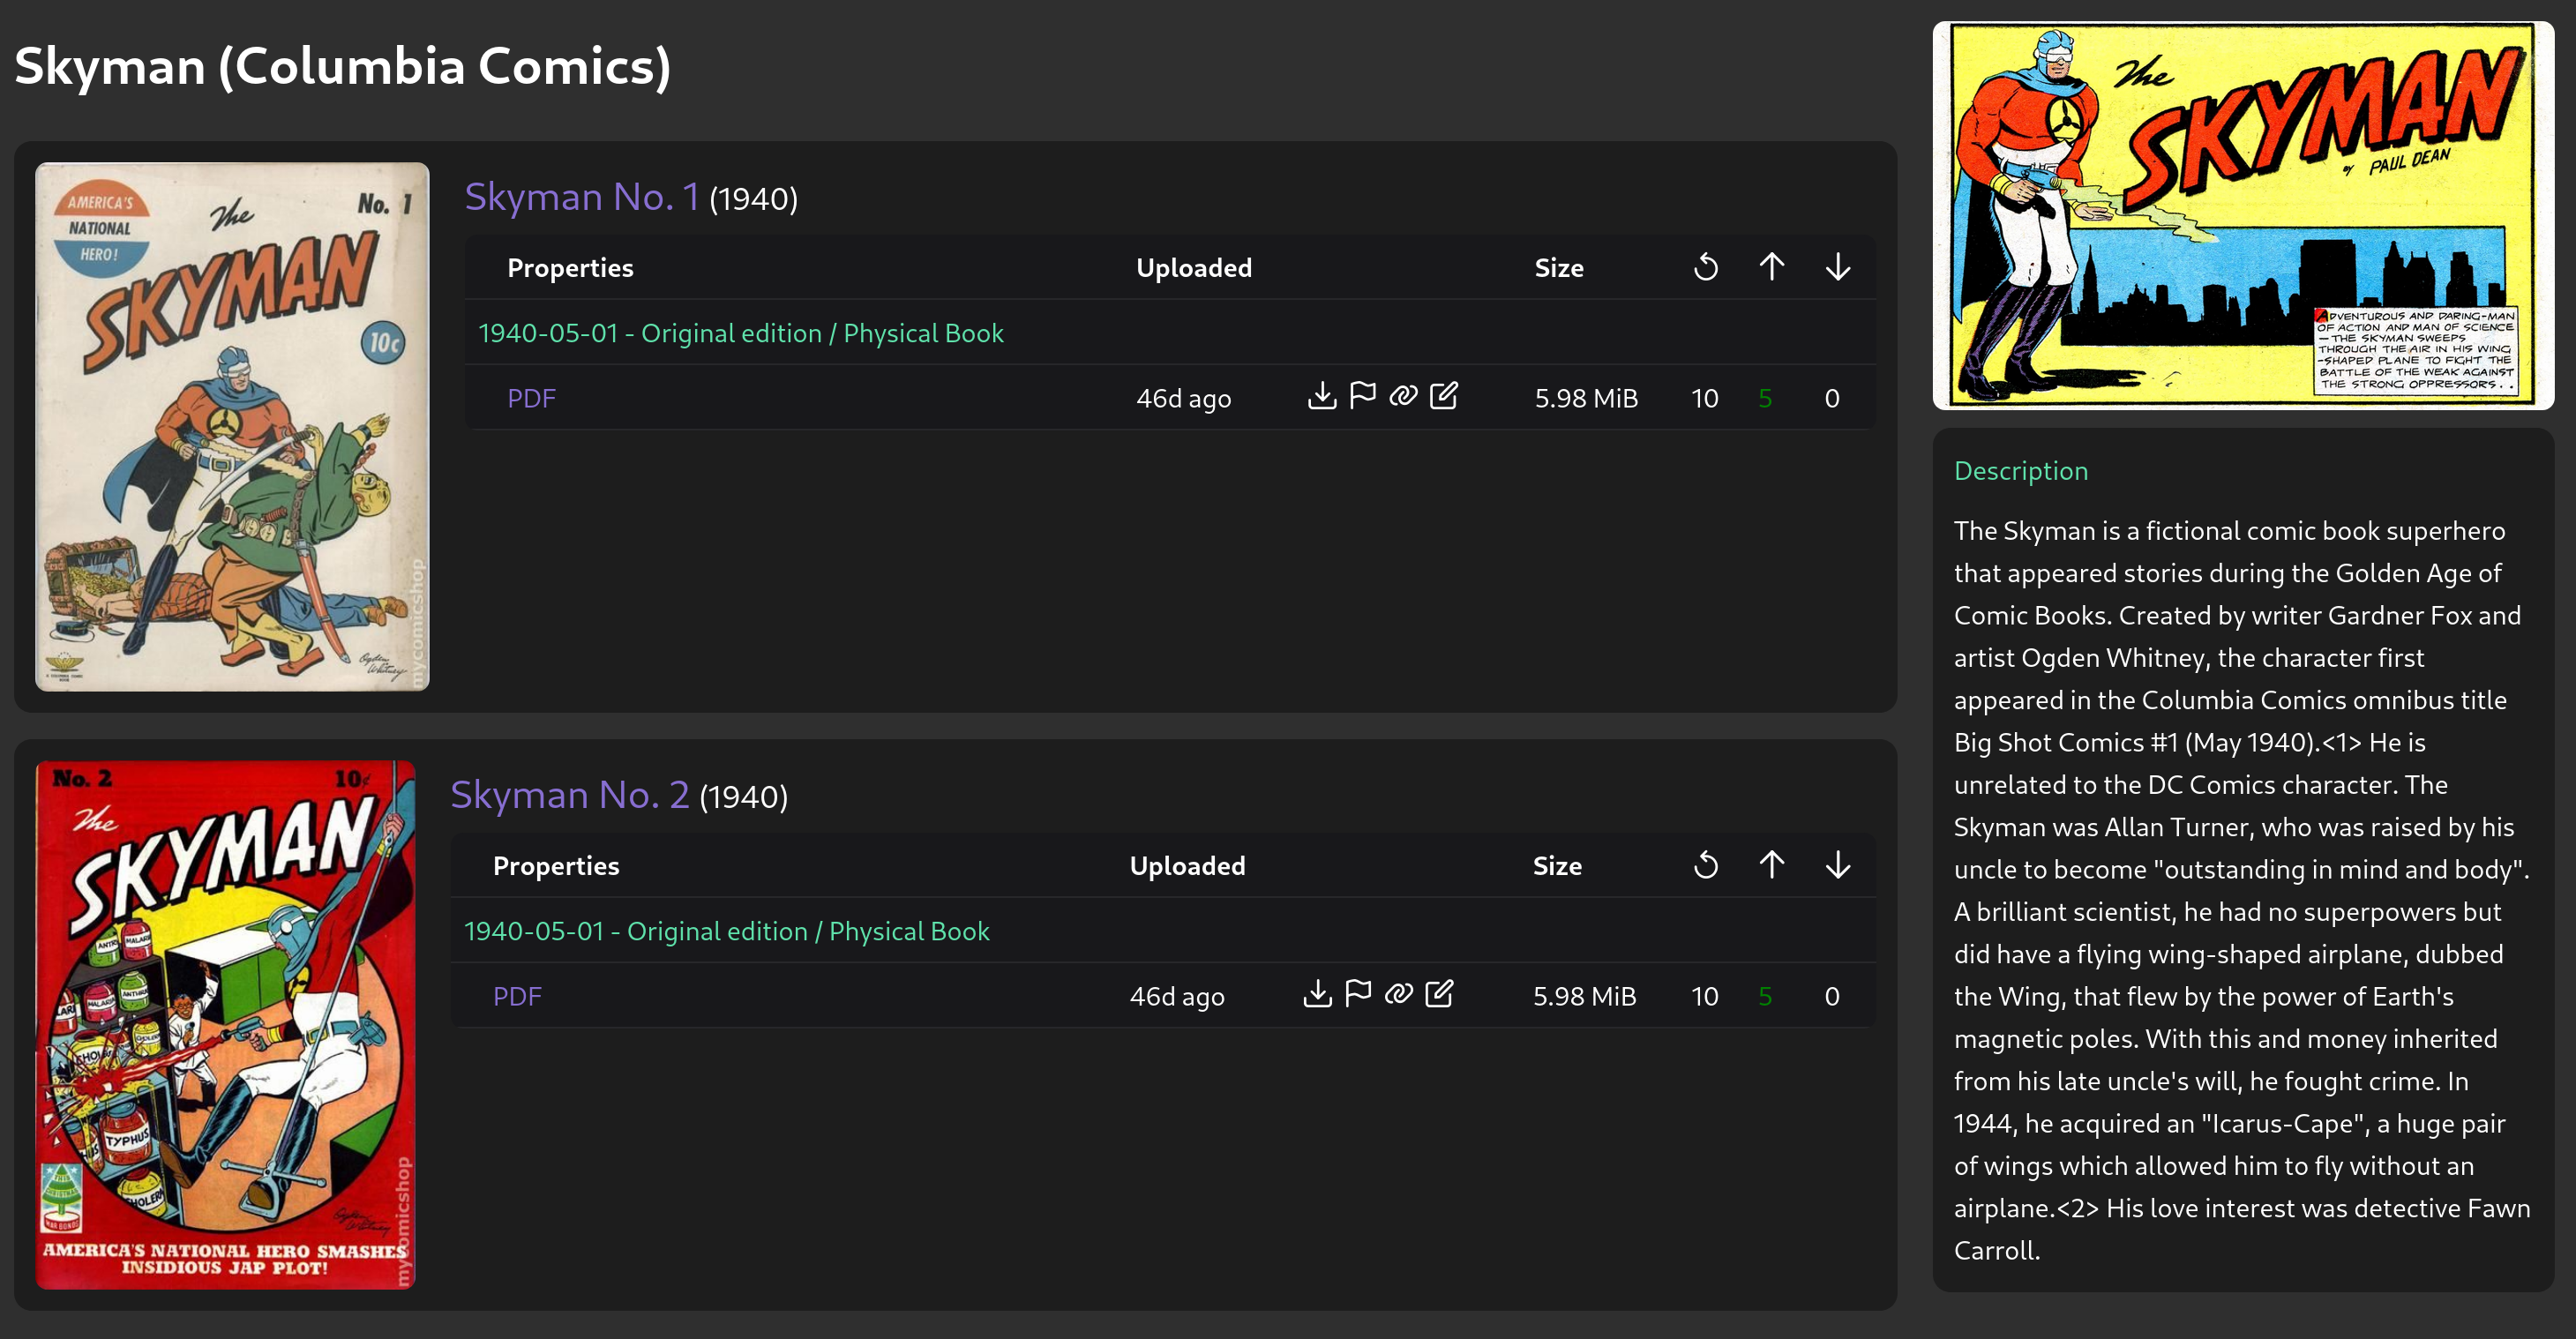
Book - Series view
Collections
Collections represent a “grouping” of content to avoid multiple uploads and reduce tracker load. Examples include site dumps, full/finished series, and monthly/yearly content groupings.
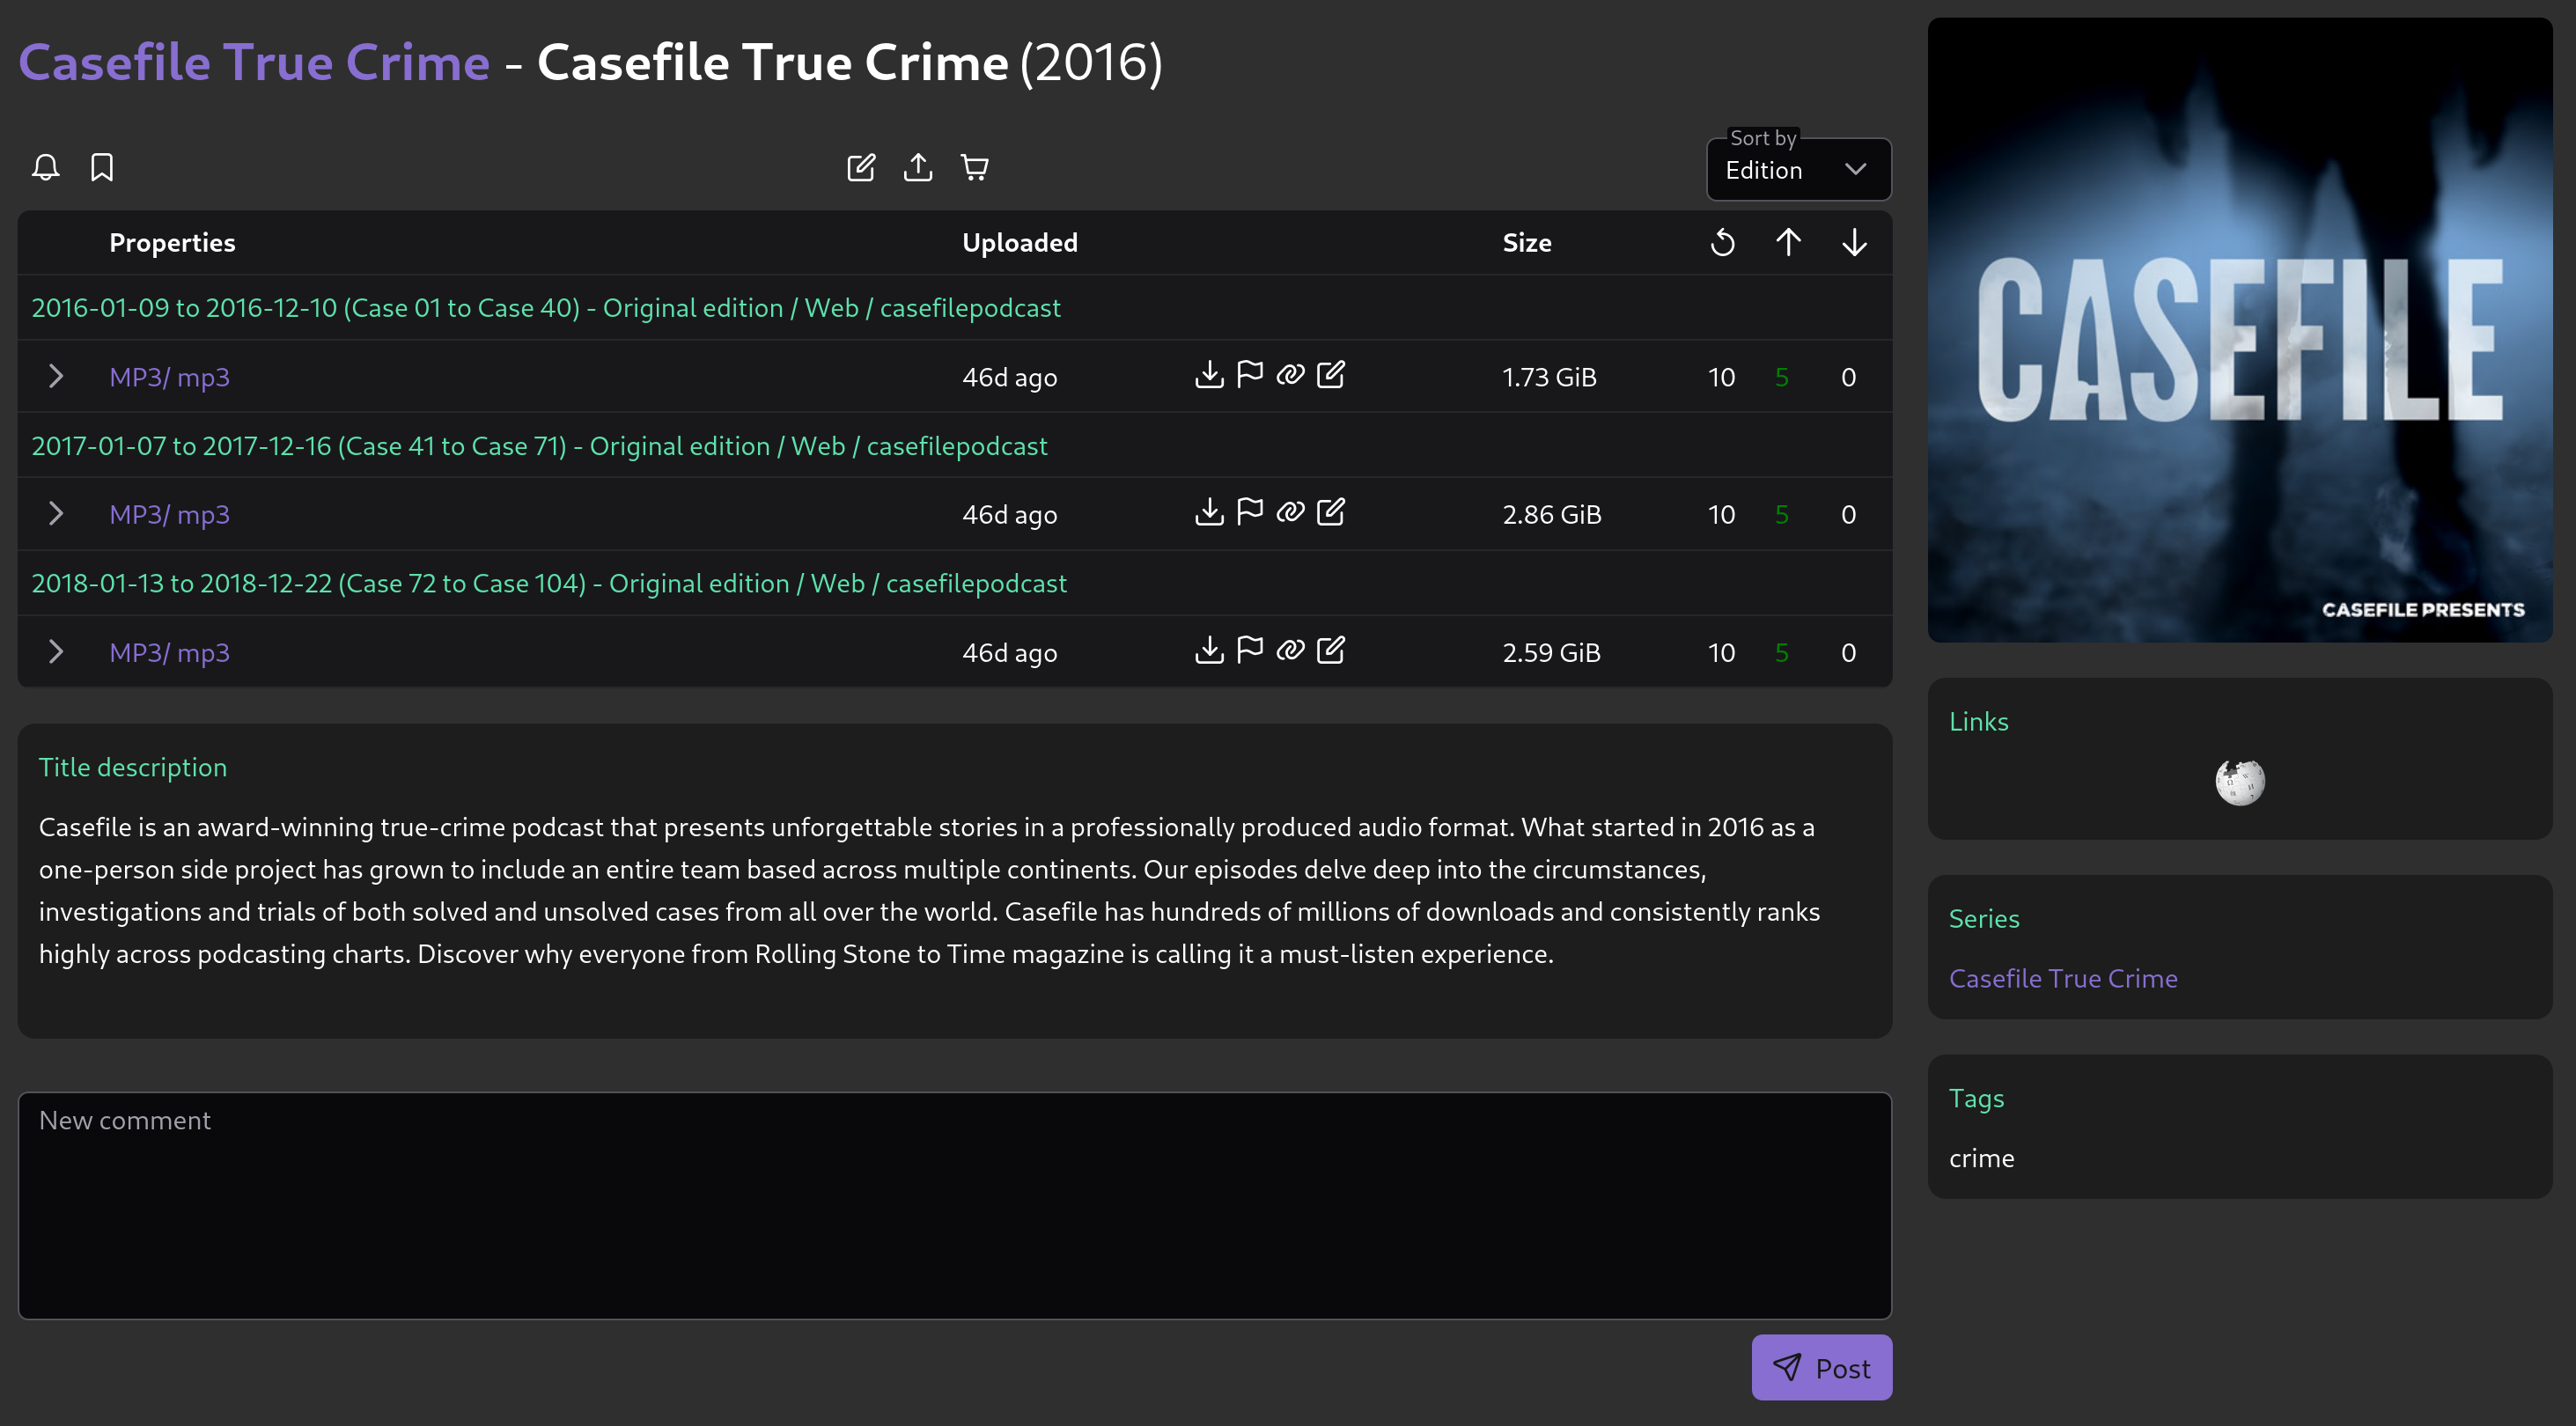
Podcast collection
Community
For contributions see CONTRIBUTING.md
Join our community:
- Discord: Join our server
Architecture
Overview
Arcadia is made of 2 main parts: the site’s API and a tracker. The site’s API is meant to be used by the frontend, while the tracker is meant to be used by torrent clients (qbittorrent, deluge, etc.).
Backend
Arcadia’s backend is a REST API written in rust with the actix framework and the sqlx database driver. It also uses PostgreSQL as its database.
Code Structure
API calls are forwarded to handlers, database requests are done by repositories, objects are defined by models. Directories with those names contain the relevant code.
A swagger for the API is available at http://localhost:8080/swagger-ui/
Frontend
Arcadia’s frontend is a SPA written in TypeScript and uses the Vue.js framework with PrimeVue components, Vite builds it.
API Schema Updates
If you make changes to structs that are listed in the swagger or the api routes, you must regenerate the typescript interfaces with this command (from the frontend directory, while the backend is running):
npx openapi-generator-cli generate -g typescript-axios -i http://127.0.0.1:8080/swagger-json/openapi.json -o ./src/services/api-schema -t .openapi-generator/templates --config .openapi-generator/openapi-generator.config.json --global-property=apiDocs=false,modelDocs=false,skipFormModel=false
Getting Started
Arcadia can be deployed using Docker Compose (recommended) or directly on bare metal.
1. Clone Repository
git clone https://github.com/Arcadia-Solutions/arcadia.git
cd arcadia
2. Choose Deployment Method
Review the Configuration Reference for secret and environment variable details, then choose your deployment route:
- Docker Deployment (Recommended): Containerized setup with bundled PostgreSQL, Redis, Caddy reverse proxy, and automatic migrations.
- Bare-Metal Installation: Manual setup running directly on the host system.
Configuration
The whole project is configured by a single config.yml file at the root of the repository:
the backend, tracker, and frontend build all read it. It is git-ignored. Some of those values are overridden by the Environment Variables in .env at runtime
cp config.example.yml config.yml
cp example.env .env
config.example.yml documents every key and serves as the reference. Settings are annotated with tags for each environment:
# Production:Settings that must be changed before deploying publicly (secrets, domain URLs, SMTP).# Bare-metal:Settings requiring host-specific adjustments when running without Docker.# Development:Settings useful during local testing (e.g. verbose logging).# Optional:Optional integrations and external plugins.
.env is used by Docker Compose to configure passwords and tokens shared across multiple services (such as PostgreSQL, Redis, Chevereto, and Ergo IRC).
For a local test with Docker Compose, the default credentials work out of the box. For a production environment, change all secrets and URLs.
Environment Variables
Any setting in config.yml can be overridden via environment variables using the naming convention:
ARCADIA_<SECTION>__<KEY> (single underscore after ARCADIA_, double underscore __ between sections and keys). Environment variables always take precedence over values in config.yml.
Note
Docker Compose vs. Host Environment: Docker Compose uses
.envto interpolate${VARIABLE}expressions defined incompose.yml. ArbitraryARCADIA_<SECTION>__<KEY>variables placed in.envare not automatically forwarded into containers unless they are explicitly declared underenvironment:incompose.ymlor added viacompose.override.yml.
Common Environment Variable Overrides
| Setting | YAML Key | Environment Variable |
|---|---|---|
| Database password | database.password | ARCADIA_DATABASE__PASSWORD=secret |
| Database host | database.host | ARCADIA_DATABASE__HOST=db |
| Redis password | redis.password | ARCADIA_REDIS__PASSWORD=secret |
| Redis host | redis.host | ARCADIA_REDIS__HOST=redis |
| API host & port | api.host, api.port | ARCADIA_API__HOST=0.0.0.0, ARCADIA_API__PORT=8080 |
| Tracker host & port | tracker.host, tracker.port | ARCADIA_TRACKER__HOST=0.0.0.0, ARCADIA_TRACKER__PORT=8081 |
| JWT Secret | api.jwt_secret | ARCADIA_API__JWT_SECRET=supersecret |
| Tracker API Key | tracker.api_key | ARCADIA_TRACKER__API_KEY=anothersecret |
Site Customization & Theming
For configuring the site logo, favicon, custom landing pages, and unauthenticated CSS/JS stylesheets, see Customization & Theming.
Optional Integrations
Some services bundled with Arcadia require additional configuration:
- IRC Server (Ergo & KiwiIRC): See IRC Server.
- Image Hosting (Chevereto): See Image Host.
- Telemetry & Monitoring: See OpenTelemetry.
Customization & Theming
Arcadia allows administrators to personalize the visual branding, landing pages, stylesheets, and assets of their instance.
Custom Landing Page
By default, visiting the root URL of an Arcadia instance displays the login view. If you wish to present a custom HTML landing page to unauthenticated visitors:
- In
config.yml, set:frontend: enable_custom_front_page: true - Place your custom HTML file at
public/home/index.html(inside the frontend directory or container). - When enabled, non-logged-in visitors landing on
/are served this page, while authenticated users are directed to the home page (HomeView.vue).
Unauthenticated Pages (Custom CSS & JS)
Pages accessible before signing in (/login, /register, /apply, /reset-password) cannot use the user-selectable CSS stylesheets configured in the database, because no user session exists.
To apply custom branding to these pages, create two optional, git-ignored files:
frontend/public/custom_unauth.css: Custom CSS rules loaded on unauthenticated pages.frontend/public/custom_unauth.js: Custom JavaScript executed on unauthenticated pages.
Note
Creating or editing these files requires updating the frontend (
docker compose up -d frontend --build)
Site Assets & Branding
You can replace the default placeholder graphics with your own site branding by replacing the following asset files:
| Asset | File Location | Purpose |
|---|---|---|
| Site Logo | frontend/src/assets/logo.svg | Main navbar logo (falls back to logo.example.svg if omitted) |
| Favicon | frontend/public/favicon.ico | Browser tab icon |
| Default Avatar | frontend/public/default_user_avatar.png | Fallback avatar for users who haven’t uploaded one |
Custom Icons (SVG Overrides)
Arcadia allows overriding any PrimeIcon across the frontend with a custom SVG file.
To replace an icon, place your .svg file into frontend/src/assets/custom-icons/ matching the PrimeIcon name without the pi- prefix:
- For example, to override the Bonus Points icon (
pi-wallet), save your SVG as:frontend/src/assets/custom-icons/wallet.svg - The build automatically generates CSS mask rules that replace the icon font glyph across the entire application with your SVG, seamlessly preserving theme colors (
currentColor), sizes, and hover effects.
Rebuilding
Custom icons and assets are inlined into the compiled frontend bundle. After adding or changing assets in frontend/src/assets/custom-icons/, rebuild the frontend. For example, with docker:
docker compose build frontend
docker compose up -d frontend
User Stylesheets (CSS Sheets)
Once users are logged in, Arcadia supports custom theme stylesheets. Users with the create_css_sheet and edit_css_sheet permissions can add and manage site-wide stylesheets through the Staff Dashboard:
- Each stylesheet is stored in the database (
css_sheetstable) with a unique name, CSS content, and an optional preview image. - Users can select their preferred active theme in their account settings.
- The instance’s default theme is defined in the site settings (
default_css_sheet_name, defaults toarcadia).
Docker Deployment
This guide will help you get Arcadia running quickly using Docker Compose.
Prerequisites
- Docker and Docker Compose installed
- Git (to clone the repository)
If running docker compose doesn’t work, you may have an older version of the docker cli installed and may need to use docker-compose instead.
Also don’t forget to use sudo if you aren’t in the docker group!
Quick Setup
-
Copy Configuration Files
cp config.example.yml config.yml
cp example.env .env
Docker Compose automatically injects inter-container networking and credentials via environment variables from
.env, so no manual changes toconfig.ymlare required for a local test run. -
Start Services
docker compose up -dThis starts the core services:
- PostgreSQL database (
db) and automatic schema migrations (init_db) - Redis cache (
redis) - Backend API and periodic task runner (
backend) - BitTorrent tracker (
tracker, listening on host port8081) - Frontend UI and reverse proxy (
frontend, powered by Caddy on host port5173)
- PostgreSQL database (
-
Database Initialization & Initial User Setup
Choose one of the following approaches depending on your deployment:
Option A: Development (Load Sample Fixtures) Populate the database with demo data:
docker compose exec -T db psql -U arcadia -d arcadia < backend/storage/migrations/fixtures/fixtures.sqlCredentials of the user with all permissions:
- Username:
picolo - Password:
test
Option B: Production (Clean Database & First Admin Setup) If you do not load
fixtures.sql, the database initializes cleanly with schema migrations alone. To set up your first administrator:- Navigate to
http://localhost:5173/register(or your domain) and register your desired username and password. - By default, newly registered users have the
newbieclass with zero administrative permissions. Promote your account to have full administrator permissions:docker compose exec -it db psql -U arcadia -d arcadia -c "UPDATE users SET permissions = enum_range(NULL::user_permissions_enum) WHERE username = 'YOUR_USERNAME';" - Log in to the web interface to access site administration and create user classes.
- Username:
-
Access the Application
- Frontend Web UI:
http://localhost:5173 - Backend API:
http://localhost:5173/api/(proxied internally via Caddy) - Tracker Announce:
http://localhost:8081/announce/<passkey>(legacy fallback:http://localhost:8081/<passkey>/announce)
- Frontend Web UI:
Production Deployment
By default, Docker Compose uses development credentials (arcadia / password). For production deployments:
-
Set Strong Passwords in
.env:cp example.env .envEdit
.envand replace all placeholder passwords (ARCADIA_DATABASE__PASSWORD,ARCADIA_REDIS__PASSWORD, etc.) with strong random values (e.g. generated viaopenssl rand -hex 32). -
Configure URLs and Secrets in
config.yml: Update settings marked# Production:inconfig.example.yml(api.jwt_secret,tracker.api_key, public URLs, andsmtp:). See also the Configuration Reference.
Docker Compose automatically propagates credentials from .env across the stack:
db: Configures PostgreSQL user, password, database, and healthcheck.init_db: InjectsDATABASE_URLfor running schema migrations.redis: Configures Redis server password authentication (--requirepass).backend&tracker: Injects database and Redis credentials via environment variables, overriding values fromconfig.yml. Leave thedatabase:andredis:sections commented out inconfig.yml(any values placed there are overridden and ignored).
Note
PostgreSQL only uses
POSTGRES_PASSWORDwhen initializing a new database cluster. If you changeARCADIA_DATABASE__PASSWORDon an existing installation after thedb_datavolume has already been initialized, you must also update the password inside PostgreSQL:docker compose exec -it db psql -U arcadia -d arcadia -c "ALTER USER arcadia WITH PASSWORD 'new_password';"
Reverse Proxy & HTTPS (Production)
The frontend container serves the static frontend files and proxies access to all other containers using Caddy.
To make Arcadia accessible via HTTPS with automatic Let’s Encrypt certificates across all services (Web UI, API, BitTorrent tracker, Chevereto image host, and Grafana monitoring), copy the tracked production templates:
cp compose.override.yml.example compose.override.yml
cp Caddyfile.example Caddyfile
Edit Caddyfile with your domain names. See the Compose Override Guide for full routing and service details.
Upgrading
For routine updates:
git fetch && git pull
docker compose up -d --build
The init_db container automatically runs pending incremental database migrations before the backend starts.
Warning
Because Arcadia is under rapid development, database schema changes are often committed directly to the baseline migration (
backend/storage/migrations/20250312215600_initdb.sql) rather than distributed as incremental migrations. When this happens,init_dbwill fail with an SQLx checksum mismatch error. When pulling updates with baseline schema changes, follow the Schema Migration Upgrade Guide to dump, recreate, and restore your database.
Troubleshooting
- If services fail to start, check logs with:
docker compose logs [service-name] - To rebuild images:
docker compose build - To reset everything:
docker compose down -v && docker compose up -d
Customizing with Compose Override
Docker Compose automatically detects and merges compose.override.yml with compose.yml. Use this to adjust ports, volumes, or environment variables without modifying the version-controlled compose.yml.
The repository provides ready-to-use example configurations tracked directly in git:
compose.override.yml.example: Configures port forwarding (80/443), Caddy volume mounts, and service tweaks.Caddyfile.example: Complete reverse proxy configuration routing the Web UI, API, IRC, BitTorrent Tracker, Chevereto image host, and Grafana monitoring.
To get started:
cp compose.override.yml.example compose.override.yml
cp Caddyfile.example Caddyfile
1. Production Setup: Exposing Services via Caddy
In production, you want Caddy to terminate HTTPS and obtain automatic Let’s Encrypt certificates for your public domains, proxying each container over Docker’s internal network:
services:
  frontend:
    ports:
      - "80:80"
      - "443:443"
      - "443:443/udp"
    volumes:
      - ./Caddyfile:/etc/caddy/Caddyfile:ro
      - caddy_data:/data
      - caddy_config:/config

volumes:
  caddy_data:
  caddy_config:
2. Development Setup: Exposing Ports for Host Debugging
services:
  db:
    ports:
      - "5432:5432"
  redis:
    ports:
      - "6379:6379"
  backend:
    ports:
      - "8080:8080"
3. Override configuration with environment variables
You can override any setting from config.yml using environment: blocks:
services:
  backend:
    environment:
      ARCADIA_API__LOG_LEVEL: "debug,sqlx=debug"
      ARCADIA_API__JWT_SECRET: "my-secure-production-secret"
  tracker:
    environment:
      ARCADIA_TRACKER__NUMWANT: "30"
Manual / Bare-Metal Installation
This page explains how to install and run Arcadia directly on your system without Docker containers.
Prerequisites
Before starting, ensure you have the following installed:
- PostgreSQL - Database server
- Redis - Cache for the auth
- Rust & Cargo - Required to build the backend
- Node.js & npm - Required to build the frontend
- Git - To clone the repository
For development tool installation instructions, see the Developer Setup guide.
Quick Start
- Clone the repository and navigate to it:
git clone https://github.com/Arcadia-Solutions/arcadia.git cd arcadia - Set up PostgreSQL database and run migrations
- Set up Redis server
- Configure
config.yml(uncommentdatabaseandredis, adapt internal URLs) - Configure and run the backend (
arcadia-api) - Configure and run the frontend (
cd frontend && npm run dev) - Configure and run the tracker (
arcadia_tracker)
Database Setup
1. Install PostgreSQL
Install PostgreSQL on your system:
Ubuntu/Debian:
sudo apt-get update
sudo apt-get install postgresql postgresql-contrib
macOS:
brew install postgresql
brew services start postgresql
Windows: Download and install from the PostgreSQL official website.
2. Create Database and User
Connect to PostgreSQL and create the database:
# Connect as postgres user
sudo -u postgres psql

# Or on Windows/macOS:
psql -U postgres
In the PostgreSQL shell:
-- Create user
CREATE USER arcadia WITH PASSWORD 'your_secure_password';

-- Create database
CREATE DATABASE arcadia OWNER arcadia;

-- Grant privileges
GRANT ALL PRIVILEGES ON DATABASE arcadia TO arcadia;

-- Exit
\q
3. Run Database Migrations
Install sqlx-cli and run migrations:
# Install sqlx-cli
cargo install sqlx-cli --no-default-features --features native-tls,postgres

# Navigate to storage directory
cd backend/storage

# Run migrations
sqlx migrate run --database-url postgresql://arcadia:your_secure_password@localhost:5432/arcadia

# Return to repository root
cd ../..
sqlx-cli only reads --database-url or DATABASE_URL, it does not know about config.yml.
Use the credentials matching your PostgreSQL setup.
(If you get a “Could not find directory of OpenSSL installation” error, install pkg-config and libssl-dev / openssl-devel).
Optional: Seed Development Fixtures
If you want to populate sample categories, users, and torrents for testing:
psql -U arcadia -d arcadia -f backend/storage/migrations/fixtures/fixtures.sql
Default test credentials: picolo / test.
For a clean production installation, skip this step and see Bootstrapping the Administrator below.
Redis Setup
Arcadia uses Redis for session management and caching.
Ubuntu/Debian:
sudo apt-get install redis-server
sudo systemctl enable --now redis-server
macOS:
brew install redis
brew services start redis
By default on local systems, Redis binds to 127.0.0.1:6379 without a password. If you configure a password in Redis (requirepass <password> in /etc/redis/redis.conf), make sure to specify it in config.yml.
Configuration for Bare Metal
Create config.yml from the example (see the Configuration Reference for details on secrets and environment variable overrides):
cp config.example.yml config.yml
Important
config.example.ymldefaults to Docker hostnames. For a bare-metal installation, review settings marked# Bare-metal:and# Production:inconfig.yml, including:
- Uncomment
database:andredis::database: host: 127.0.0.1 port: 5432 user: arcadia password: your_secure_password name: arcadia redis: host: 127.0.0.1 port: 6379 password: ""- Adjust internal URLs:
- In
tracker:, seturl_internal: http://localhost:8081(nothttp://tracker:8081).- Set production secrets:
api.jwt_secretandtracker.api_key.
Backend Setup
Build and Run
From the repository root:
cargo run -p arcadia-api --release
The backend server (including the integrated periodic task scheduler) will start and listen on port 8080 (http://localhost:8080).
Frontend Setup
Build and Run
Navigate to the frontend directory, install dependencies, and start the development server:
cd frontend
npm install
npm run dev
The frontend will be accessible at http://localhost:5173. Vite proxies /api/ requests to the backend at http://localhost:8080.
Tracker Setup
Build and Run
From the repository root in a separate terminal:
cargo run -p arcadia_tracker --release
The BitTorrent tracker will start listening on port 8081.
Bootstrapping the Administrator
If you did not load the development fixtures.sql:
- Open the web interface at
http://localhost:5173/registerand create your user account. - Newly created accounts default to the
newbieuser class. Connect to PostgreSQL to grant full administrator permissions:psql -U arcadia -d arcadia -c "UPDATE users SET permissions = enum_range(NULL::user_permissions_enum) WHERE username = 'YOUR_USERNAME';"
Upgrading
For routine updates that do not alter the database schema:
git fetch && git pull
cargo build -p arcadia-api --release
cargo build -p arcadia_tracker --release
cd frontend && npm install && npm run build && cd ..
Restart your backend and tracker services.
Warning
If upstream commits modify database schema migrations (
initdb.sql), follow the Schema Migration Upgrade Guide for the data dump and schema migration procedure.
Troubleshooting
Database Issues
PostgreSQL not running:
# Ubuntu/Debian
sudo systemctl start postgresql
sudo systemctl enable postgresql

# macOS
brew services start postgresql
Connection errors:
- Verify PostgreSQL is running on port 5432
- Check that the database and user exist
- Ensure the
databasesection ofconfig.ymlis correct
Build Issues
Backend API build fails:
- Install system dependencies listed above
- Update Rust:
rustup update - Clear build cache:
cargo clean
Frontend build fails:
- Check Node.js version compatibility
- Clear npm cache:
npm cache clean --force - Delete
node_modulesand runnpm installagain
Runtime Issues
Backend API won’t start:
- Check the database connection
- Verify the values in
config.yml - Ensure migrations have been run
Frontend can’t connect to backend API:
- Verify the backend is running on the correct port
- Check
frontend.api_base_urlinconfig.yml, and restart the frontend: the section is inlined in the bundle at build time
Environment Variable Overrides
Any value in config.yml can be overridden via environment variables without editing the file.
See the Configuration section for the full ARCADIA_<SECTION>__<KEY> syntax and common examples.
Stopping Arcadia
To stop Arcadia:
- Stop the frontend with
Ctrl+Cin its terminal - Stop the tracker with
Ctrl+Cin its terminal and wait for its graceful shutdown - Stop the backend API with
Ctrl+Cin its terminal - Optionally stop PostgreSQL if you don’t need it for other applications
Integrations Overview
Arcadia provides optional bundled services managed through Docker Compose profiles. By default, running docker compose up -d starts only the core services (db, init_db, redis, backend, tracker, frontend).
To activate optional integrations, specify their profile:
| Profile | Command | Services Started | Description |
|---|---|---|---|
| All Services | docker compose --profile full up -d | All containers | Starts the complete stack including IRC, Chevereto, and Grafana. |
| IRC Chat | docker compose --profile irc up -d | ergo, ergo_database | Ergo IRC daemon with KiwiIRC web client and MariaDB history. |
| Image Hosting | docker compose --profile images up -d | chevereto_php, chevereto_database | Chevereto image hosting platform for avatars and torrent media. |
| Telemetry | docker compose --profile telemetry up -d | otel-lgtm, hostmetrics | OpenTelemetry collector and pre-built Grafana dashboards. |
Profiles can be combined:
docker compose --profile irc --profile images up -d
IRC Server (Ergo & KiwiIRC)
Arcadia includes integrated IRC chat using Ergo as the IRC server and KiwiIRC as the web-based chat client. KiwiIRC is used on the home page and as a help chat for unauthenticated users, but any IRC client can be used to reach ergo.
The integration is optional and runs in dedicated containers enabled via the irc or full Docker Compose profiles.
Setup Guide
1. Copy Configuration Templates
Before starting the IRC service, create copies of the example configuration files:
cp ergo/ergo-conf.yaml.example ergo/ergo-conf.yaml
cp ergo/ergo.motd.example ergo/ergo.motd
cp kiwiirc/config.json.example kiwiirc/config.json
Important
ergo/ergo-conf.yamlandergo/ergo.motdmust exist on the host before starting the container, ascompose.ymlmounts them and would otherwise create empty directories.
2. Configure Tokens & Enable in config.yml
In .env, define secure random tokens:
ARCADIA_ERGO__API_BEARER_TOKEN=your_secure_bearer_token
ARCADIA_ERGO__AUTH_CALLBACK_TOKEN=your_other_secure_token
In config.yml, uncomment the ergo: block to activate IRC features:
ergo:
  api_url: http://ergo:8089
(Alternatively, provide ARCADIA_ERGO__API_URL: http://ergo:8089 in compose.override.yml under backend.environment).
Note
Arcadia’s backend uses
api_bearer_tokento provision IRC accounts via Ergo’s administrative HTTP API (/v1/saregister). When users connect, Ergo verifies their credentials against Arcadia via an auth callback secured byauth_callback_token. ergo needs the callback_token int theauth-script(loaded from the environment in the default setup)
3. Start IRC Services
Launch the IRC daemon and history database:
docker compose --profile irc up -d
docker compose restart backend
Services started:
ergo: The IRC daemon. External desktop clients (HexChat, WeeChat) can connect via plain IRC on port6667.ergo_database: MariaDB instance storing channel and direct message history.frontend: Caddy automatically routes KiwiIRC assets at/kiwiirc/and proxies WebSocket connections (/webirc/websocket→ergo:8097).
Channels & Guest Webchat
In config.yml, configure default channels that unauthenticated visitors can join from the login page:
frontend:
  irc_webchat_guest_channels:
    - "#help"
To support unauthenticated guest chat, ensure accounts.require-sasl.enabled: false in ergo/ergo-conf.yaml. Keep member-only channels restricted by setting their channel mode to +r (registered accounts only).
Local Development with Vite
When running npm run dev in the frontend directory:
- Vite proxies
/webirc/websockettows://localhost:8097. - Expose port
8097incompose.override.yml:services: ergo: ports: - "8097:8097" - Build and extract KiwiIRC web assets locally:
cd frontend
npm run kiwi:setup
Image Hosting (Chevereto)
Arcadia bundles Chevereto to host images on your site.
The service is optional and runs in dedicated containers enabled via the images or full Docker Compose profiles.
Setup Guide
1. Configure Credentials and Start Containers
In .env, define secure passwords for the MariaDB instance:
CHEVERETO_DB_PASS=your_secure_chevereto_password
CHEVERETO_DB_ROOT_PASS=very_secure_chevereto_root_password
Launch the image hosting services:
docker compose --profile images up -d
2. Run the Initial Web Installer & Generate API Key
- Open your browser and navigate to
http://localhost:8083(or your configured domain). - Complete the initial installation wizard to create your administrator account and initialize tables.
- Once logged in as administrator, navigate to Dashboard → Settings → API.
- Generate and copy the API v1 key.
3. Connect Arcadia to Chevereto
In config.yml, configure the image_host: section:
image_host:
  chevereto_api_url: http://chevereto_php/api/1/upload
  chevereto_api_key: your_generated_chevereto_api_key
  # Automatically rehost posters and covers retrieved by scrapers (TMDB, MusicBrainz)
  rehost_external_images: true
(Alternatively, inject the API key via environment variable: ARCADIA_IMAGE_HOST__CHEVERETO_API_KEY=your_key).
Restart the backend container to apply the configuration:
docker compose restart backend
4. Enable Image Uploader in Staff Dashboard
By default, the frontend drag-and-drop uploader is disabled. To activate it:
- Log in with an account having administrator permissions.
- In the top navbar, navigate to Staff Dashboard → Arcadia Settings.
- Enable Display image upload drag and drop and save changes.
The image upload widget will now appear when creating or editing torrents, editions, and artists. If you enforce an Approved Image Hosts whitelist in site settings, add your image hosting domain to the list.
Production Reverse Proxy & HTTPS
To expose Chevereto on a dedicated subdomain in production, configure CHEVERETO_HOSTNAME in compose.override.yml and enable the Chevereto block in Caddyfile (both pre-configured in compose.override.yml.example and Caddyfile.example).
Monitoring (OpenTelemetry & Grafana)
Arcadia includes deep observability instrumentation with OpenTelemetry. The backend, BitTorrent tracker, and periodic background scheduler emit structured metrics and distributed traces via OTLP gRPC.
Architecture
When running with the telemetry or full profile, Docker Compose provisions:
otel-lgtm: A unified container bundling Grafana (port3000), Prometheus/Mimir (metrics), Loki (logs), and Tempo (traces) with an integrated OTLP gRPC collector on port4317.hostmetrics: An OpenTelemetry Collector container gathering system-level host metrics (CPU, RAM, disk I/O, network) from the Docker host.
Setup Guide
1. Set Grafana Password in .env
In .env, define your secure administrator password for the Grafana UI:
GF_SECURITY_ADMIN_PASSWORD=your_secure_grafana_password
2. Start the Telemetry Containers
Launch the monitoring services:
docker compose --profile telemetry up -d
3. Enable Telemetry Export in Arcadia
In config.yml, configure the telemetry: section to export OTLP data:
telemetry:
  otlp_endpoint: http://otel-lgtm:4317
Restart backend and tracker to begin exporting data:
docker compose restart backend tracker
4. Import the Pre-Built Dashboard
- Open your browser and navigate to
http://localhost:3000. - Sign in with:
- Username:
admin - Password: the value of
GF_SECURITY_ADMIN_PASSWORD(defaults toarcadia).
- Username:
- In the left navigation bar, go to Dashboards → New → Import.
- Click Upload dashboard JSON file and select
opentelemetry/sample-dashboard.jsonfrom the repository. - Click Import.
The imported dashboard provides real-time visibility into:
- API endpoint request rates, response latency percentiles (p50, p95, p99), and HTTP status codes.
- BitTorrent tracker announce and scrape request throughput.
- Peer connection tracking, caching ratios, and active peer counts.
- Periodic background tasks: execution intervals, durations, and rows affected.
- Host CPU, memory pressure, and network throughput.
Production Reverse Proxy & HTTPS
To access Grafana securely in production, enable the Grafana block in Caddyfile (pre-configured in Caddyfile.example).
Upgrading Arcadia
This guide covers updating an existing Arcadia deployment for both Docker Compose and Bare-Metal installations.
1. Routine Updates (No Schema Changes)
When pulling updates that do not alter database migrations in backend/storage/migrations/:
Docker:
git fetch && git pull
docker compose up -d --build
The init_db container automatically applies any pending incremental migrations and starts the application stack.
Bare-Metal:
git fetch && git pull
cargo build -p arcadia-api --release
cargo build -p arcadia_tracker --release
cd frontend && npm install && npm run build && cd ..
Restart your backend (arcadia-api) and tracker (arcadia_tracker) processes or systemd services.
2. Upgrading Across Schema Changes
Because Arcadia is currently under rapid development, database schema changes are often committed directly to the baseline migration (backend/storage/migrations/20250312215600_initdb.sql) rather than distributed as incremental migration scripts.
When upstream commits alter 20250312215600_initdb.sql, running sqlx migrate run (or letting the Docker init_db service run) directly against an existing database will fail with a checksum mismatch error.
Use the following procedure to migrate your data into the updated schema.
Note
In the commands below, replace
arcadiawith your configured database username or database name if you modified defaults in.env(Docker) orconfig.yml(bare-metal).
Step 1: Dump Existing Data
Create a data-only SQL dump with explicit column inserts, excluding the _sqlx_migrations table:
Docker:
docker compose exec -T db pg_dump -U arcadia -d arcadia --data-only --column-inserts -T _sqlx_migrations > arcadia-data.sql
Bare-Metal:
pg_dump -U arcadia -d arcadia --data-only --column-inserts -T _sqlx_migrations > arcadia-data.sql
Important
Verify that
arcadia-data.sqlexists, is non-empty, and is stored in a safe backup location before proceeding.
Step 2: Pull Latest Commits
git fetch && git pull
Step 3: Recreate Database and Apply Schema
Drop and recreate the database, then run the updated schema migration:
Docker:
# Stop backend and tracker to release existing database connections
docker compose stop backend tracker

# Drop and recreate the database
docker compose exec -T db dropdb -U arcadia arcadia
docker compose exec -T db createdb -U arcadia arcadia

# Rebuild init_db image with the new migrations and apply schema
docker compose build init_db
docker compose run --rm init_db
Bare-Metal: Stop backend and tracker services and then:
# drop and recreate the database
dropdb -U arcadia arcadia
createdb -U arcadia arcadia
# run the new migrations
cd backend/storage
sqlx migrate run --database-url postgresql://arcadia:your_password@localhost:5432/arcadia
cd ../..
Step 4: Clear Pre-seeded Default Rows
The initial migration seeds default rows (arcadia_settings, system users, default user_classes, css_sheets, and initial forum_* entries). Truncate these seeded tables before restoring your dump to prevent primary key conflicts:
Docker:
docker compose exec -T db psql -U arcadia -d arcadia -c "
TRUNCATE users, user_classes, css_sheets, arcadia_settings,
         forum_categories, forum_sub_categories, forum_threads, forum_posts CASCADE;
"
Bare-Metal:
psql -U arcadia -d arcadia -c "
TRUNCATE users, user_classes, css_sheets, arcadia_settings,
         forum_categories, forum_sub_categories, forum_threads, forum_posts CASCADE;
"
Step 5: Restore Data
Restore the dump while temporarily disabling foreign-key triggers (session_replication_role = 'replica'). This allows foreign-keyed tables (such as hierarchical user_classes or forum relationships) to restore regardless of insert ordering:
Docker:
(echo "SET session_replication_role = 'replica';"; cat arcadia-data.sql; echo "SET session_replication_role = 'default';") | docker compose exec -T db psql -U arcadia -d arcadia -v ON_ERROR_STOP=1
Bare-Metal:
(echo "SET session_replication_role = 'replica';"; cat arcadia-data.sql; echo "SET session_replication_role = 'default';") | psql -U arcadia -d arcadia -v ON_ERROR_STOP=1
Step 6: Recompile and Restart
Start the stack with updated code and dependencies:
Docker:
docker compose up -d --build
Bare-Metal:
cargo build -p arcadia-api --release
cargo build -p arcadia_tracker --release
cd frontend && npm install && npm run build && cd ..
Restart your backend (arcadia-api) and tracker (arcadia_tracker) processes or systemd services.
Backup
Backups are made with restic: every run is an encrypted, deduplicated snapshot, so only what changed is stored and transferred.
backup/backup.shruns on the arcadia server. It dumps the databases (arcadia, ergo, chevereto), then snapshots the dumps, the configuration files (config.yml,ergo/ergo-conf.yaml,ergo/ergo.motd,kiwiirc/config.json,compose.override.yml) and the volumes (docker) or data directories (bare metal) into a local repository, and prunes it.backup/cron.shrunsbackup.shon the schedule ofbackup.cron, inside thebackup_croncompose service (docker mode only).backup/pull.shruns on a separate backup host. It copies the snapshots it does not have yet over ssh, so the backup host keeps its own history, which the arcadia server cannot reach or delete.backup/restore.shrestores a snapshot, on the same server or on a new one.
The database volumes are never copied raw (files of a running database are not consistent): the dumps cover them.
Requirements
- docker mode: nothing but docker. The backup image carries restic,
pg_dumpandmariadb-dump(no docker CLI, no docker socket). Restoring runs on the host and uses restic from its pinned image. - host mode: restic 0.17 or newer,
pg_dump/psql,mariadb-dump/mariadbmatching the server versions, andcurl(backup/restore.sh uses it to check that the backend is stopped). The scripts run as root. - backup host: restic 0.17 or newer, a checkout of this repository (or
backup/pull.shandscripts/config_value.sh).
Configuration
Everything is in the backup section of config.yml, documented in config.example.yml. The
database credentials are read from the database section, and in docker mode the ergo and chevereto
credentials come from the environment of the backup_cron service.
Environment variables named ARCADIA_<SECTION>__<KEY> (upper-cased, - replaced by _, e.g.
ARCADIA_DATABASE__PASSWORD) override the values of config.yml. The ARCADIA_ prefix and __
separator keep a compose.override.yml able to set credentials without touching config.yml.
In docker mode the backup location is set only by two .env settings (see example.env); the repo,
dumps and password file live inside them and config.yml does not repeat their paths (backup.repo,
backup.dump_dir and backup.password_file are host mode only, ignored in docker mode):
BACKUP_DIR(default/var/backups/arcadia): host directory holding the repo and dumps, bind-mounted at the fixed path/var/backups/arcadiain the container.restore.shruns on the host and readsBACKUP_DIRfrom.envto find the repository and dumps.RESTIC_PASSWORD_FILE: host path of the password file, kept outside ofBACKUP_DIR. It is bind-mounted at the fixed path/root/.arcadia-restic-password.
Create the repository password, and keep a copy somewhere safe, it is not part of the backups:
head -c 32 /dev/urandom | base64 > /root/.arcadia-restic-password
chmod 600 /root/.arcadia-restic-password
The repository is created by the first run of backup/backup.sh.
keep decides how many snapshots the server keeps. It must outlast the longest outage of the backup
host, or snapshots are pruned before being pulled. remote_repo optionally copies every snapshot to
other repositories: it is a space-separated list of push targets (local paths, s3:, rest:, sftp:,
any restic backend).
Scheduling
backup.mode decides how: in docker mode the backup_cron service runs the job on the schedule of
backup.cron, in host mode (or if you prefer the host’s own tools) a systemd timer runs it.
Docker: the backup_cron service
docker compose --profile backup up -d backup_cron
backup.cron holds the schedule in cron syntax, read in backup.cron_timezone (containers have no
timezone of their own). The job is backup/backup.sh itself, so everything the sections above
describe applies. The container joins the compose network and dumps db (postgres) and
ergo_database/chevereto_database (mariadb) over TCP, the mariadb ones as their per-database user,
not root. restic runs inside the container. There is no docker socket and no docker CLI: the image is
based on postgres:18-alpine (so pg_dump matches the db service) plus restic and the mariadb
client.
The service mounts the installation (read only), BACKUP_DIR, the password file and each volume of
backup.volumes at /data/<name> (read only). config.yml is the configuration, together with the
.env settings above.
To run a backup by hand:
docker compose --profile backup run --rm --entrypoint /arcadia/backup/backup.sh backup_cron
In docker mode backup/backup.sh cannot be run directly on the host: the database service names
resolve only on the compose network.
The output of a run, and the fact that it failed, are in the container log:
docker compose logs backup_cron
systemd, on the host
/etc/systemd/system/arcadia-backup.service:
[Unit]
Description=Arcadia backup

[Service]
Type=oneshot
ExecStart=/opt/arcadia/backup/backup.sh
/etc/systemd/system/arcadia-backup.timer:
[Timer]
OnCalendar=*-*-* 03:00
Persistent=true

[Install]
WantedBy=timers.target
systemctl enable --now arcadia-backup.timer
A failing run exits with a non-zero code: use OnFailure= (or cron’s mail) to be notified.
Backup host
On the arcadia server, give the backup host’s ssh key access to a backup user that can read the
repository and write its locks (restic creates new files group readable when the repository is):
useradd -m backup
chgrp -R backup /var/backups/arcadia/repo
chmod -R g+rX /var/backups/arcadia/repo
chmod g+w /var/backups/arcadia/repo/locks
find /var/backups/arcadia/repo -type d -exec chmod g+s {} +
On the backup host, write a configuration file, e.g. /etc/arcadia-backup-pull.yml:
backup_pull:
  ssh: backup@arcadia.example.com
  source_repo: /var/backups/arcadia/repo
  # command run on the arcadia server before pulling, empty when it runs its own timer, e.g.
  # sudo /opt/arcadia/backup/backup.sh (needs a sudo rule for the backup user)
  trigger: ""
  repo: /srv/backups/arcadia
  # a copy of the arcadia repository password
  password_file: /root/.arcadia-restic-password
  # retention of the backup host, longer than the server's and keeping at least what it keeps
  keep: --keep-daily 30 --keep-weekly 12 --keep-monthly 12
and schedule ARCADIA_CONFIG=/etc/arcadia-backup-pull.yml /opt/arcadia/backup/pull.sh after the
server’s backup, the same way as above (Environment=ARCADIA_CONFIG=… in the service). It fails when
no new snapshot was found, which also catches a server that stopped backing up. Missed days are
caught up: every missing snapshot is copied. The backup host’s keep must keep at least every
snapshot the server still keeps, otherwise pruned snapshots are copied again and counted as new.
Restore
backup/restore.sh            # latest snapshot
backup/restore.sh 1a2b3c4d   # a given snapshot, ids from `restic snapshots`
backup/restore.sh latest -y  # no confirmation
Stop the backup timer (and the backup host’s trigger) before restoring, otherwise a backup can run in
the middle and latest changes.
Restore is run on the host, in both modes (in docker mode it uses the host’s docker and restores the
volumes through the pinned restic image). It restores the configuration files, the volumes (or data directories) and the databases. In docker
mode it stops the running services first and starts them again at the end. In host mode, stop
arcadia, ergo and redis yourself first, and create the postgres role of the database section on a
new server. Run backup/restore.sh from the deployment checkout (the same directory the stack was started from), because in docker mode the restore derives the compose project name from the directory to locate the real data volumes.
On a new server
- Clone the repository,
cp config.example.yml config.yml: only thebackupsection matters, it is overwritten by the restoredconfig.yml.dump_dirmust be the one used for the backups. - Put the password file in place.
- From the backup host, copy the repository to the new server:
restic -r sftp:root@new-server:/var/backups/arcadia/repo init --from-repo /srv/backups/arcadia --copy-chunker-params restic -r sftp:root@new-server:/var/backups/arcadia/repo copy --from-repo /srv/backups/arcadia backup/restore.sh, then start the services.
From docker to bare metal (or back)
Not scripted. Restore a volume into a directory with
restic restore latest:/data/ergo_data --target /var/lib/ergo, and load the dumps of
dump_dir with psql and mariadb.
Limits
- Paths and volume names cannot contain spaces, the crontab of the
backup_cronservice included: the job it schedules is one unquoted line. - Restoring in docker mode creates the volumes outside of docker compose, which warns that they were “not created by Docker Compose”; it is harmless.
backup.volumestakes unprefixed volume names, and each one must also be bind-mounted at/data/<name>in thebackup_cronservice ofcompose.yml: it is a two-place edit.- A volume listed in
backup.volumesbut never populated is backed up empty: nothing checks that it exists. - The mariadb dump is skipped only when the service is unreachable. A reachable service whose dump fails (bad credentials, for instance) fails the run.
Maintenance
A few tools are available in the Staff Dashboard on the frontend (once the user is granted the user_maintenance_tools permission). You might make use of them in such situations:
- updated the
sourceflag for.torrentfiles - manual changes in the db that caused a drift in cached counts (amount of title groups for a given artist for example)
Contributing
First, thanks for considering contributing to Arcadia!
Contributing Process
Whether you want to add a new feature or fix an existing issue, it needs to be done on your own branch:
- Fork this repository
- Clone it locally on your computer
- create a new branch
feature-nameorbug-name-fix(with the proper name) - open a pull request when your contribution is done
If you are unsure about what/how to do something, don’t hesitate to open a discussion or an issue about the topic.
You can also hop on the Discord server to chat with other devs and the community.
Finding Contributions to Make
Arcadia has boards to track the existing issues and features that need to be worked on. Feel free to claim one that isn’t claimed yet before starting to work on it.
To claim a github issue, simply leave a comment on it saying that you are working on it.
You can also search for TODOs in the code and pick one of those tasks. If you decide to do this, please open an issue first and claim it before working on the task.
Backend Development Notes
-
If you make changes to/add sql queries with
sqlx, you need to runcargo sqlx prepareinside thebackend/storagefolder before committing your changes. It reads the database from theDATABASE_URLenvironment variable (see Developer Setup), not fromconfig.yml. This command will generate some files that allow the queries to be tested without a database running. Our CI pipeline relies on that, and will fail if the command hasn’t been ran. You can setup a git pre-commit hook if you want. -
For better code quality, we use clippy in our CI pipeline. You can set your editor to run
cargo clippyinstead ofcargo check(on file save, etc.).
Developer Setup
Development Containers (Optional)
If you don’t want to install another toolchain on your system, You can also use devcontainers instead. If you don’t know, think of isolated minimal virtual machines that come with the tools required to build Arcadia (or anything else really).
If you have Docker (recommended!) installed and use Visual Studio Code, all you need is to have the Dev Containers extension installed and “reopening your folder in a container”. You can find that option in your Command Palette, or by clicking on the new status bar item in the left bottom corner.
You can also use GitHub Codespaces to build Arcadia in the cloud without having to download anything but streams of text, although it’s not as free as a local dev container.

It isn’t required to use them but can be useful in some cases (especially if you’re using an immutable OS).
Required Tools
You need these to make meaningful contributions to Arcadia, outside the cases of documentation for example.
- Node.js & npm
- Cargo (version 1.88.0 and higher)
Recommended Tools
- Prettier for proper formatting of the frontend’s code.
- sqlx-cli for managing database related stuff, including migrations.
- Docker for setting up dependencies. Optional but HIGHLY recommended!
- Insomnia for testing the backend’s API. You could also use any other client if you want.
Configuration Setup
Everything is configured by a single config.yml at the root of the repository. A quick way to
get started is cp config.example.yml config.yml: that sample documents every key and is the
reference for what each one does.
Compile-Time Requirement: DATABASE_URL
The sqlx query macros check the queries against a real database at compile time, and sqlx
only reads DATABASE_URL. It is needed for cargo build, cargo clippy, and cargo sqlx prepare,
never by the running services.
If you already created .env from example.env, append DATABASE_URL to it so existing credentials are not overwritten:
echo 'DATABASE_URL=postgresql://arcadia:password@localhost:5432/arcadia' >> .env
If you are running the database with Docker, port 5432 is not exposed to the host by default.
See the database port mapping overrides
to expose it with compose.override.yml.
Docker builds don’t need it, they build with SQLX_OFFLINE=true against the committed .sqlx
caches.
Building and Running
API
# Build the backend
cargo build -p arcadia-api

# Run the backend binary
./target/debug/arcadia-api

# For optimized builds
cargo build -p arcadia-api --release
./target/release/arcadia-api
Frontend
cd frontend

# Install dependencies
npm install

# Build and run development server
npm run dev

# For production build
npm run build
Development Workflow
Backend Development
# For development with auto-rebuild on changes
cd backend/api
cargo run

# Build and test
cargo build -p arcadia-api
cargo test

# Code quality checks
cargo clippy --fix --allow-dirty
cargo fmt --all
Frontend Development
cd frontend

# Development server with hot reload
npm run dev

# Run tests
npm run test:unit

# Lint and format
npm run lint
npm run format
Optional: IRC & KiwiIRC Webchat in Local Development
When running npm run dev, Vite includes proxying for Ergo’s WebSocket endpoint (/webirc/websocket → ws://localhost:8097) and serves static KiwiIRC webchat assets under /kiwiirc/.
Both components are completely optional during development. If KiwiIRC is not built, Vite displays an informative placeholder in the chat drawer. If Ergo is not running, WebSocket connection failures are handled silently so the Vite dev server remains stable.
To enable full IRC and KiwiIRC functionality locally:
-
Expose Ergo’s WebSocket port in Docker: By default, port
8097is not exposed on the host. Create or add tocompose.override.ymlat the repository root:services: ergo: ports: - "8097:8097"Then start Ergo:
docker compose --profile irc up -d ergo(See also Docker Compose Overrides).
-
Populate
kiwiirc/dist: KiwiIRC assets are git-ignored. You can automatically build and extract them using Dockercd frontend npm run kiwi:setupThis builds KiwiIRC using Docker with the repository’s pinned commit and extracts the compiled assets into
kiwiirc/dist/.
Note
Vite dynamically intercepts
/kiwiirc/static/config.json(falling back toconfig.json.exampleif not present) and/kiwiirc/static/plugins/arcadia-plugin.jsto serve them directly from thekiwiirc/directory in the repository. You can modify either file and refresh the browser without rebuilding KiwiIRC.
Common Docker Commands
Auto-rebuild with Compose Watch
For live development, Compose Watch automatically rebuilds images or syncs frontend files on source changes:
docker compose up --watch
Or when running attached without -d, press W to enable watch mode.
Exporting Test Data
If you added new test data in your local container and wish to update the repository fixtures:
docker compose exec -T db pg_dump -U arcadia -d arcadia --data-only --inserts --column-inserts > backend/storage/migrations/fixtures/fixtures.sql && sed -i '/SELECT pg_catalog.set_config(\x27search_path\x27, \x27\x27, false);/d' backend/storage/migrations/fixtures/fixtures.sql
1 line generated by pgdump must be removed as it prevents the collage_entry fixtures from being inserted (the trigger somehow can’t be interprted). If someone has an explanation, please let us know/open a PR!
Manual Database Setup (if needed)
Arcadia automatically runs migrations on launch (init_db container), but if you need to manually run migrations against a running database:
cargo install sqlx-cli
DATABASE_URL=postgresql://arcadia:password@localhost:5432/arcadia cargo sqlx database setup
sqlx-cli only reads DATABASE_URL (configured in .env), it does not read config.yml.
Make sure the database port is exposed.
Plugins
Plugins let an instance add custom behaviour without forking arcadia and without merging anything upstream. A plugin is a separate service that arcadia calls over HTTP, so it can be written in any language and deployed independently.
For now, plugins can add external sources (scrapers), like the built in TMDB, MusicBrainz, ISBN and Comic Vine ones.
Configuration
Declare your plugins in the scrapers section of config.yml, at the root of the repository:
scrapers:
  - id: anime
    placeholder: Anime url
    sources:
      AniDB:
        - tv_show
      MyAnimeList:
        - tv_show
        - movie
    url: http://anime-plugin:9000/scrape
    timeout_seconds: 30
| Field | Description |
|---|---|
id | Identifier used in the route /api/external-sources/<id>. Must not clash with a built in source (tmdb, musicbrainz, isbn, comic-vine). |
placeholder | Placeholder of the input field displayed in the interface, also used as the source’s display name. |
sources | The websites the endpoint accepts links from, each with the content types it supports: movie, video, tv_show, music, podcast, software, book, live_performance, collection. A single endpoint may serve several websites, dispatching on the link it is given. They are listed in a tooltip next to the input on the upload page once there are several of them, and the source is offered for every content type at least one of them supports. |
url | Endpoint of the plugin. |
timeout_seconds | Optional, defaults to 30. |
config.yml is read once at startup. When the scrapers section is absent, no plugin is
registered.
Both config.yml and compose.override.yml are git ignored. compose.yml already mounts
config.yml into the backend container, so only the plugin services themselves have to be declared
in compose.override.yml, which Docker Compose loads automatically on top of compose.yml:
services:
  anime-plugin:
    build: ../anime-plugin
    restart: unless-stopped
Writing a scraper plugin
The declared endpoint is called with the identifier the user typed as the url query parameter:
GET http://anime-plugin:9000/scrape?url=https://anidb.net/anime/1234
It must answer with JSON:
{
  "title_group": { "name": "...", "description": "...", "content_type": "tv_show", "...": "..." },
  "edition_group": null,
  "affiliated_artists": [
    {
      "name": "Some Person",
      "aliases": [],
      "description": "",
      "pictures": ["https://example.com/picture.jpg"],
      "external_links": ["https://example.com/person/1"],
      "roles": ["director"],
      "nickname": null
    }
  ]
}
title_group follows the UserCreatedTitleGroup schema and edition_group the
UserCreatedEditionGroup one; both are documented in the OpenAPI specification. All three fields are optional.
Artists are given by name: arcadia creates them, merges the roles of an artist appearing several times, and returns real affiliated artists to the interface. Arcadia also checks beforehand whether a title group already has the submitted link, and appends that link to the scraped title group.
external_links is optional and holds the artist’s pages on public databases and other trackers.
Pictures are rehosted if image rehosting is enabled.
Anything else the plugin needs (API keys, caching, rate limiting) is its own business.
Reporting a failure
A plugin that cannot scrape answers with a status outside the 2xx range and a body holding the
message meant for the uploader:
{ "error": "www.example.com answered with 503 Service Unavailable" }
Arcadia shows that message as is, and answers the interface with a 502 whatever status the plugin
used. A failure with no such body, an unreachable plugin, and an answer arcadia cannot read are
reported as a generic error instead, the details only being logged. Write the message for the
uploader: what they can act on (a wrong url, a page holding nothing, a site that is down), never a
stack trace or an internal identifier.
Testing Guide
Arcadia maintains automated test suites across both the Rust backend services and the Vue 3 frontend.
1. Backend Testing (Rust)
Backend testing is split between fast in-memory unit tests and database-backed Actix integration tests.
Unit Tests
Unit tests live directly alongside source code in #[cfg(test)] mod tests modules within each crate (shared, backend/api, backend/common, backend/storage, tracker/arcadia_tracker, and backend/periodic-tasks).
Run all unit tests across the workspace:
cargo test --lib
To run unit tests for a specific crate:
cargo test -p arcadia-shared --lib
cargo test -p arcadia_tracker --lib
Integration & API Tests
Integration tests live in backend/api/tests/. They use:
actix_web::test: Simulates HTTP requests against real Actix service endpoints without binding to a host network port.sqlx::test: Executes tests against a test PostgreSQL database, using transaction rollbacks and SQL test fixtures (located inbackend/api/tests/fixtures/).
To run integration tests, ensure a database is accessible via DATABASE_URL (or started with docker compose up -d db):
cargo test -p arcadia-api --test '*'
To run a single integration test file:
cargo test -p arcadia-api --test test_auth
cargo test -p arcadia-api --test test_torrent
2. Frontend Testing (Vue 3 & TypeScript)
The frontend uses modern testing frameworks integrated with Vite and npm scripts.
Unit & Component Testing (Vitest)
Unit tests use Vitest, a Vite-native test runner optimized for Vue 3 composables, Pinia stores, and utility functions (such as media parsers and formatters).
Run the unit test suite:
cd frontend
npm run test:unit
To run tests in watch mode during development:
cd frontend
npx vitest watch
End-to-End Testing (Playwright)
Browser-level end-to-end testing is powered by Playwright. Playwright launches headless browser engines (Chromium, Firefox, WebKit) to verify user authentication, browsing, search filters, and form submissions.
Run end-to-end tests:
cd frontend
npm run test:e2e
Linters & Formatting
cd frontend
npm run lint
npm run format
Legal Notice
This tool (Arcadia) is intended for legal use only. Users (both the ones hosting Arcadia and the ones using it) are solely responsible for the content they download and share through it. Downloading or distributing copyrighted material without proper authorization is illegal in most jurisdictions. By hosting and/or using Arcadia, you agree to abide by all applicable laws and respect intellectual property rights. The developers of Arcadia assume no responsibility for any illegal activities conducted by its hosters and users.